Pfaff hobby 541 Owner's Manual - Page 33
Pfaff hobby 541 Manual
 |
View all Pfaff hobby 541 manuals
Add to My Manuals
Save this manual to your list of manuals |
Page 33 highlights
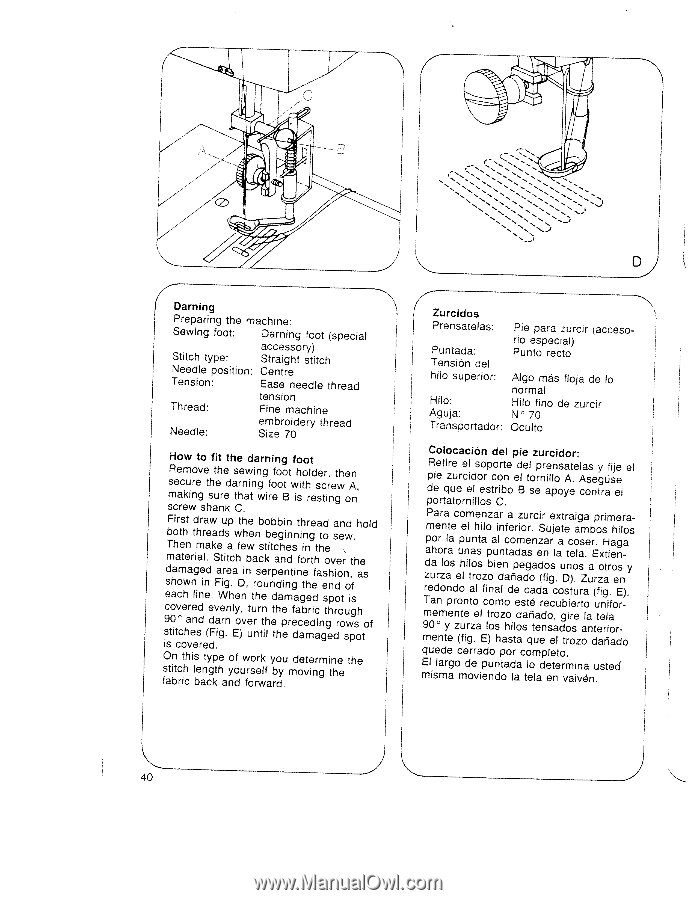
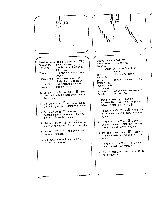
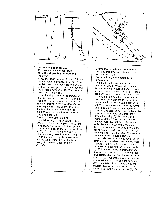
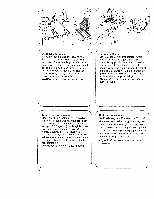
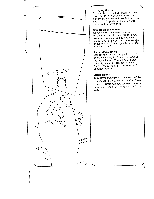
4 * V 'S 'S •% S. 'S - • '. '.5 %. '.55'" - •' 55% 'S_) Darning Preparing the machine: Sewing foot: Darning foot (special accessory) Stitch type: Straight stitch Needle position: Centre Tension: Ease needle thread tension Thread: Fine machine Needle: embroidery thread Size 70 How to fit the darning foot Remove the sewing foot holder, then secure the darning foot with screw A. making sure that wire B is resting on screw shank C. First draw up the bobbin thread and hold both threads when beginning to sew. Then make a few stitches in the material. Stitch back and forth over the damaged shown in area in Fig. D, serpentine fashion, rounding the end of as each line. When the damaged spot is covered evenly, turn the fabric through 90° and darn stitches (Fig. is covered. over the preceding rows of E) until the damaged spot On this type of work you determine the stitch length yourself by moving the fabric back and forward. D 4. Zurcidos Prensatelas: Pie para zurcir (acceso Puntada: rio especial) Punto recto Tension del hilo superior: Algo más floja de lo normal Hilo: Aguja: Hilo fino de zurcir N° 70 Transportador: Oculto Colocación del pie zurcidor: Retire el soporte del prensatelas y fije pie zurcidor con el tornillo A. Aseguse el de que el estribo B se apoye contra el portatornillos C. Para comenzar a zurcir extraiga primera mente por Ia ahora el hilo inferior. Sujete ambos hilos punta al cornenzar a coser. Haga unas puntadas en Ia tela. Extien da los hilos bien pegados zurza el trozo dañado (fig. unos a otros D). Zurza en y redondo al final de cada costura (fig. E). Tan pronto como esté recubierto unifor memente el trozo dañado, gire Ia tela 90° y zurza los hilos tensados anterior mente (fig. E) hasta que el trozo dañado quede cerrado por completo. El largo de puntada lo determina usted misma moviendo a tela en vaivén. 40
-
 1
1 -
2
-
3
-
4
-
5
-
6
-
7
-
8
-
9
-
10
-
11
-
12
-
13
-
14
-
15
-
16
-
17
-
18
-
19
-
20
-
21
-
22
-
23
-
24
-
25
-
26
-
27
-
 28
28 -
 29
29 -
 30
30 -
 31
31 -
 32
32 -
 33
33 -
 34
34 -
 35
35 -
 36
36 -
 37
37 -
 38
38 -
39
-
40
-
41
-
42
 |
 |