Pfaff hobby 541 Owner's Manual - Page 32
Dleft Dit
 |
View all Pfaff hobby 541 manuals
Add to My Manuals
Save this manual to your list of manuals |
Page 32 highlights
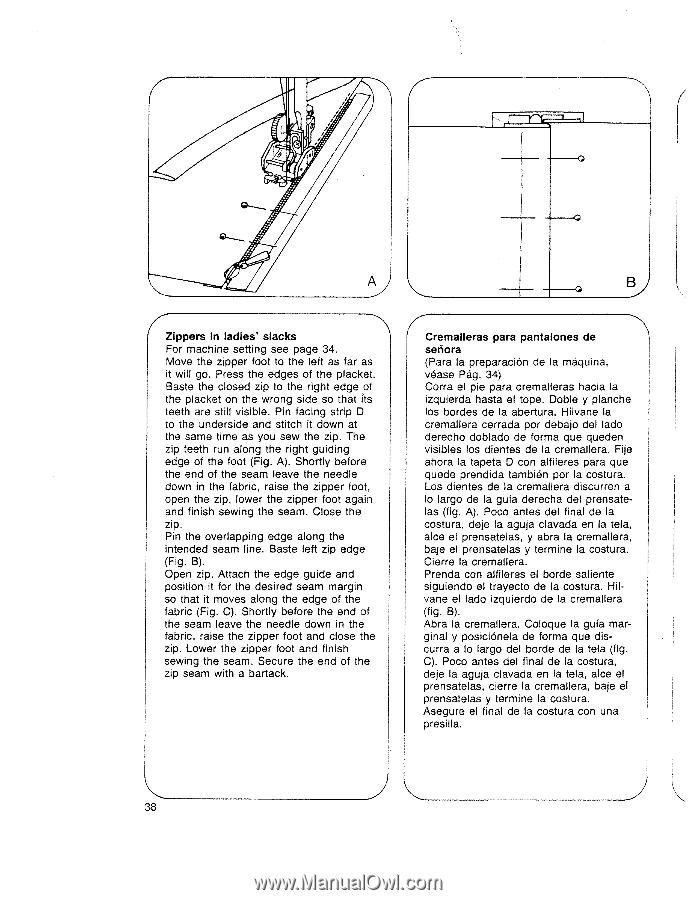
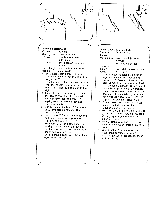
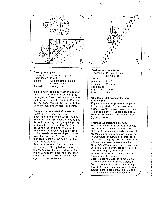
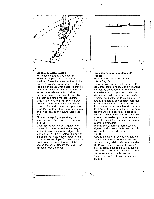
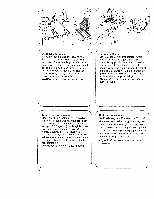
Ik // - __-,Iu ,, II tIi -0 -0 Zippers in ladies' slacks For machine setting see page 34. Move the zipper foot to the left as far as it will go. Press the edges of the placket. Baste the closed zip to the right edge of the placket on the wrong side so that its teeth are still visible. Pin facing strip D to the underside and stitch t down at the same time as you sew the zip. The zip teeth run along the right guiding edge of the foot (Fig. A). Shortly before the end of the seam leave the needle down in the fabric, raise the zipper foot, open the zip, lower the zipper foot again and finish sewing the seam. Close the zip. Pin the overlapping edge along the intended seam line. Baste left zip edge (Fig. B). Open zip. Attach the edge guide and position it for the desired seam margin so that it moves along the edge of the fabric (Fig. C). Shortly before the end of the seam leave the needle down in the fabric, raise the zipper foot and close the zip. Lower the zipper foot and finish sewing the seam. Secure the end of the zip seam with a bartack. B I Cremalleras para pantalones de señora (Para Ia preparaciOn de a maquina, vêase Pág. 34) Corra el pie para cremalleras hacia Ia izquierda hasta el tope. Doble y planche los bordes de a abertura. Hilvane Ia cremallera cerrada por debajo del ado derecho doblado de forma que queden visibles los dientes de Ia cremallera, Fije ahora Ia tapeta D con alfileres para que quede prendida también por Ia costura. Los dientes de Ia cremallera discurren a lo argo de Ia gula derecha del prensate las (fig. A). Poco antes del final de Ia costura, deje Ia aguja clavada en Ia tela, alce el prensatelas, y abra Ia cremallera, baje el prensatelas y termine Ia costura. Cierre a cremallera. Prenda con alfileres el borde saliente siguiendo el trayecto de Ia costura. Hil vane el lado izquierdo de Ia cremallera (fig. B). Abra Ia cremallera. Coloque Ia gufa mar ginal y posiciOnela de forma que dis curra a lo largo del borde de Ia tela (fig. C). Poco antes del final de Ia costura, deje Ia aguja clavada en Ia tela, alce el prensatelas, cierre Ia cremallera, baje el prensatelas y termine Ia costura. Asegure el final de Ia costura con una presilla. K 38
-
 1
1 -
2
-
3
-
4
-
5
-
6
-
7
-
8
-
9
-
10
-
11
-
12
-
13
-
14
-
15
-
16
-
17
-
18
-
19
-
20
-
21
-
22
-
23
-
24
-
25
-
26
-
 27
27 -
 28
28 -
 29
29 -
 30
30 -
 31
31 -
 32
32 -
 33
33 -
 34
34 -
 35
35 -
 36
36 -
 37
37 -
38
-
39
-
40
-
41
-
42
 |
 |