Pioneer 1140HD Owner's Manual - Page 89
Resetting to default, Other convenient features
 |
UPC - 012562829593
View all Pioneer 1140HD manuals
Add to My Manuals
Save this manual to your list of manuals |
Page 89 highlights
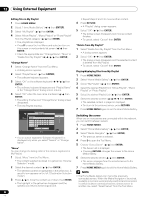
Using External Equipment 12 English • If a previously connected server can not be found or if the server is in the sleep mode, the server name is dimmed (grayed out). • In some cases, you may be able to start a media server if it supports "Wake On LAN". Select the server and press ENTER to have it transmit a "Wake On LAN" command to the Plasma Display. • You cannot select a server unless that media server has been set up. 6 Press ENTER after the following steps are complete: "Download", "Write" and "Verify" • A restart dialog screen appears. 7 Press ENTER after reading a notice on the screen. • The system is restarted then the Home Media Gallery screen returns. • Software update finishes. Resetting to default You can reset the setups you have entered within the Home Media Gallery function to default (See "Default Settings" on page 87). 1 Press HOME MENU. 2 Select "Setup" ( / then ENTER). 3 Select "Default Settings" ( / then ENTER). 4 Select "Reset" ( / then ENTER). • A restart dialog screen appears. 5 Press ENTER on the dialog screen. • The setup finishes. • The system restarts then the Home Media Gallery screen returns. Setup Software Update To check whether the software needs to be updated or not. Home Media Gallery must be connected to a USB device. Connect the USB device and press the Next button. Current Version: 1.x.xx Next Cancel 1 NOTE • On average, it may take 15 minutes or more to complete a software update. Other convenient features Screen saver During navigation, the screen saver launches automatically if no activity is sensed within five minutes. • No screen saver is available while a movie or slideshow is played. • Pressing any key cancels screen saver. When canceled with a USB device being connected, connecting operation resumes. NOTE • Pressing INFO to display the Player status or key guide before screen saver is activated may cause image retention to appear. Do not display the Player status and key guide for an extended period of time while playing a movie or slideshow. Software Update Software update is available on the Pioneer website (http:// www.pioneerelectronics.com). Make sure that you have a USB flash memory. First download the software according to the guidelines on the website and perform the following procedure for update: 1 Press HOME MENU. 2 Select "Home Media Gallery" ( / then ENTER). 3 Select "Setup" ( / then ENTER). 4 Select "Software Update" ( / then ENTER). • A "Software Update" submenu appears. 5 Select "Next" ( / then ENTER). • The next screen appears. Complete the procedure following the guidelines on the screen. 89 En
-
 1
1 -
2
-
3
-
4
-
5
-
6
-
7
-
8
-
9
-
10
-
11
-
12
-
13
-
14
-
15
-
16
-
17
-
18
-
19
-
20
-
21
-
22
-
23
-
24
-
25
-
26
-
27
-
28
-
29
-
30
-
31
-
32
-
33
-
34
-
35
-
36
-
37
-
38
-
39
-
40
-
41
-
42
-
43
-
44
-
45
-
46
-
47
-
48
-
49
-
50
-
51
-
52
-
53
-
54
-
55
-
56
-
57
-
58
-
59
-
60
-
61
-
62
-
63
-
64
-
65
-
66
-
67
-
68
-
69
-
70
-
71
-
72
-
73
-
74
-
75
-
76
-
77
-
78
-
79
-
80
-
81
-
82
-
83
-
 84
84 -
 85
85 -
 86
86 -
 87
87 -
 88
88 -
 89
89 -
 90
90 -
 91
91 -
 92
92 -
 93
93 -
 94
94 -
95
-
96
-
97
-
98
-
99
-
100
-
101
-
102
-
103
-
104
-
105
-
106
-
107
-
108
-
109
-
110
-
111
-
112
-
113
-
114
-
115
-
116
-
117
-
118
-
119
-
120
 |
 |
