Pioneer AVHP6000DVD Owner's Manual - Page 22
Loading/Ejecting discs, Basic Operations - dvd player
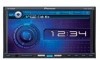 |
UPC - 012562890685
View all Pioneer AVHP6000DVD manuals
Add to My Manuals
Save this manual to your list of manuals |
Page 22 highlights
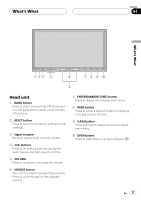
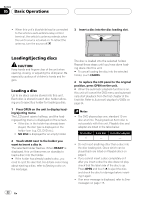
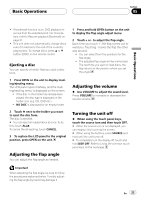
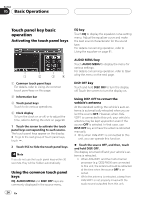
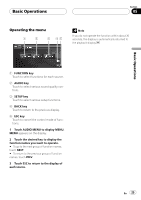
Section 05 Basic Operations ! When this unit's blue/white lead is connected to the vehicle's auto-antenna relay control terminal, the vehicle's antenna extends when this unit's source is turned on. To retract the antenna, turn the source off. 3 Insert a disc into the disc loading slot. Loading/Ejecting discs CAUTION Keep hands and fingers clear of the unit when opening, closing, or adjusting the LCD panel. Be especially cautious of children's hands and fingers. Loading a disc Up to six discs can be stored into this unit. Each disc is stored in each disc holder allowing you to specify a holder for loading a disc. 1 Press OPEN on the unit to display loading/ejecting menu. The LCD panel opens halfway, and the loading/ejecting menu is displayed on the screen. ! If the disc in the holder has already been played, the disc type is displayed on the holder icon (e.g. CD, DVD etc.). ! NO DISC is displayed for an empty holder. 2 Touch LOAD next to the holder you want to insert a disc in. The selected holder flashes. When READY is displayed, this unit becomes on standby to load a disc into the holder. # If the holder has already loaded a disc, you need to eject the disc first. For details concerning about ejecting a disc, refer to Ejecting a disc on the next page. The disc is loaded into the selected holder. Repeat these steps until you have done loading discs into this unit. # To cancel loading the disc into the selected holder, touch CANCEL. 4 To replace the LCD panel to the original position, press OPEN on the unit. # When the automatic playback function is on, this unit will cancel the DVD menu and automatically start playback from the first chapter of the first title. Refer to Automatic playback of DVDs on page 34. Notes ! The DVD player plays one, standard 12-cm disc at a time. Playing back an 8-cm disc is not possible with this unit. Playable disc and adapter are listed in the table below. 12-cm disc Ö 8-cm disc - 8-cm disc adapter - ! Do not insert anything other than a disc into the disc loading slot. Discs which can be played back are listed on Playable discs on page 9. ! If you cannot insert a disc completely or if after you insert a disc the disc does not play, check that the label side of the disc is up. Press OPEN and touch h to eject the disc, and check the disc for damage before inserting it again. ! If an error message is displayed, refer to Error messages on page 115. 22 En
-
 1
1 -
2
-
3
-
4
-
5
-
6
-
7
-
8
-
9
-
10
-
11
-
12
-
13
-
14
-
15
-
16
-
 17
17 -
 18
18 -
 19
19 -
 20
20 -
 21
21 -
 22
22 -
 23
23 -
 24
24 -
 25
25 -
 26
26 -
 27
27 -
28
-
29
-
30
-
31
-
32
-
33
-
34
-
35
-
36
-
37
-
38
-
39
-
40
-
41
-
42
-
43
-
44
-
45
-
46
-
47
-
48
-
49
-
50
-
51
-
52
-
53
-
54
-
55
-
56
-
57
-
58
-
59
-
60
-
61
-
62
-
63
-
64
-
65
-
66
-
67
-
68
-
69
-
70
-
71
-
72
-
73
-
74
-
75
-
76
-
77
-
78
-
79
-
80
-
81
-
82
-
83
-
84
-
85
-
86
-
87
-
88
-
89
-
90
-
91
-
92
-
93
-
94
-
95
-
96
-
97
-
98
-
99
-
100
-
101
-
102
-
103
-
104
-
105
-
106
-
107
-
108
-
109
-
110
-
111
-
112
-
113
-
114
-
115
-
116
-
117
-
118
-
119
-
120
-
121
-
122
-
123
-
124
-
125
-
126
-
127
-
128
-
129
 |
 |
