Pioneer AVHP6000DVD Owner's Manual - Page 53
Listening to XM Satellite Radio, XM tuner GEX-P920XM
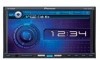 |
UPC - 012562890685
View all Pioneer AVHP6000DVD manuals
Add to My Manuals
Save this manual to your list of manuals |
Page 53 highlights
XM tuner (GEX-P920XM) Section 12 XM tuner (GEX-P920XM) Listening to XM Satellite Radio 12 3 4 56 8 7 You can use this unit to control an XM satellite digital tuner (GEX-P920XM), which is sold separately. For details concerning operation, refer to the XM tuner's operation manuals. This section provides information on XM operations with this unit which differs from that described in the XM tuner's operation manual. ! This unit does not have the text scroll function. 1 Source name Shows the selected source name. 2 Source icon Shows what the source has been selected. 3 XM band indicator Shows the XM band which has been selected. 4 XM preset number indicator Shows what XM preset has been selected. 5 XM channel select setting indicator Shows what channel select setting has been selected. ALL CH is displayed when ALL CH is selected for the channel select mode, and CATEGORY is displayed when CATEGORY is selected for the channel select mode. ! Refer to Switching the XM channel select mode on the next page. 6 XM channel number indicator Shows to which XM channel number the tuner is tuned. 7 Category select keys/preset select keys Shows the category select keys when the channel select setting is CATEGORY or the preset select keys when the channel select setting is ALL CH. 8 Detail information or preset list display Shows the detail information of the broadcast channel currently being received or the preset list. 1 Touch the source icon and then touch XM to select the XM. 2 Touch the screen to display the touch panel keys. 3 Touch BAND to select an XM band. Touch BAND repeatedly until the desired XM band is displayed, XM1, XM2 or XM3. 4 Touch c or d to select a desired channel. The channels move up or down step by step. Channels that cannot currently be selected are skipped, and the next channel is selected. # If you touch and hold c or d, you can increase or decrease the channel number continuously. # You can also select a channel by pressing c or d button. # You can also perform tuning from a desired channel category. (Refer to Selecting a channel in the channel category on the next page.) En 53
-
 1
1 -
2
-
3
-
4
-
5
-
6
-
7
-
8
-
9
-
10
-
11
-
12
-
13
-
14
-
15
-
16
-
17
-
18
-
19
-
20
-
21
-
22
-
23
-
24
-
25
-
26
-
27
-
28
-
29
-
30
-
31
-
32
-
33
-
34
-
35
-
36
-
37
-
38
-
39
-
40
-
41
-
42
-
43
-
44
-
45
-
46
-
47
-
 48
48 -
 49
49 -
 50
50 -
 51
51 -
 52
52 -
 53
53 -
 54
54 -
 55
55 -
 56
56 -
 57
57 -
 58
58 -
59
-
60
-
61
-
62
-
63
-
64
-
65
-
66
-
67
-
68
-
69
-
70
-
71
-
72
-
73
-
74
-
75
-
76
-
77
-
78
-
79
-
80
-
81
-
82
-
83
-
84
-
85
-
86
-
87
-
88
-
89
-
90
-
91
-
92
-
93
-
94
-
95
-
96
-
97
-
98
-
99
-
100
-
101
-
102
-
103
-
104
-
105
-
106
-
107
-
108
-
109
-
110
-
111
-
112
-
113
-
114
-
115
-
116
-
117
-
118
-
119
-
120
-
121
-
122
-
123
-
124
-
125
-
126
-
127
-
128
-
129
 |
 |
