Pioneer AVHP6000DVD Owner's Manual - Page 98
Setting the clock, Selecting video on rear display, Setup
 |
UPC - 012562890685
View all Pioneer AVHP6000DVD manuals
Add to My Manuals
Save this manual to your list of manuals |
Page 98 highlights
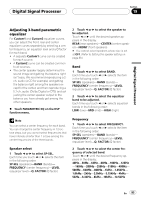
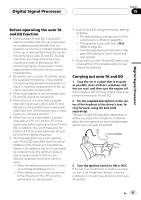
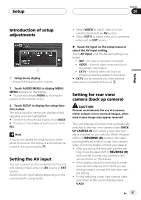
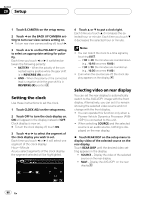
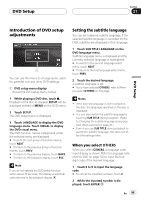
Section 20 Setup 1 Touch B.CAMERA on the setup menu. 2 Touch c on the BACK UP CAMERA setting to turn rear view camera setting on. # To turn rear view camera setting off, touch d. 3 Touch c or d on the POLARITY setting to select an appropriate setting for polarity. Each time you touch c or d it switches between the following polarity: ! BATTERY - When the polarity of the connected lead is positive while the gear shift is in REVERSE (R) position ! GND - When the polarity of the connected lead is negative while the gear shift is in REVERSE (R) position Setting the clock Use these instructions to set the clock. 1 Touch CLOCK ADJ on the setup menu. 2 Touch OFF to turn the clock display on. ON will appear in the display instead of OFF. Clock display is now on. # To turn the clock display off, touch ON. 3 Touch c or d to select the segment of the clock display you wish to set. Each time you touch c or d it will select one segment of the clock display: Hour-Minute As you select segments of the clock display the segment selected will be highlighted. 4 Touch a or b to put a clock right. Each time you touch a it increases the selected hour or minute. Each time you touch b it decreases the selected hour or minute. Notes ! You can match the clock to a time signal by touching JUST. - If 00 to 29, the minutes are rounded down. (e.g., 10:18 becomes 10:00.) - If 30 to 59, the minutes are rounded up. (e.g., 10:36 becomes 11:00.) ! Even when the sources are off, the clock display appears on the display. Selecting video on rear display You can set the rear display to automatically switch to the AVG-VDP1 image with the front display. Alternatively, you can set it to remain showing the selected video source and not change with the front display. ! You can operate this function only when a Pioneer Vehicle Dynamics Processor (AVGVDP1) is connected to this unit. ! When selecting SOURCE and the selected source is an audio source, nothing is displayed on the rear display. % Touch REAR DISP on the setup menu to display video of the selected source on the rear display. Touch REAR DISP until the desired video setting appears in the display. ! SOURCE - Display the video of the selected source on the rear display ! NAVI - Display the AVG-VDP1 on the rear display 98 En
-
 1
1 -
2
-
3
-
4
-
5
-
6
-
7
-
8
-
9
-
10
-
11
-
12
-
13
-
14
-
15
-
16
-
17
-
18
-
19
-
20
-
21
-
22
-
23
-
24
-
25
-
26
-
27
-
28
-
29
-
30
-
31
-
32
-
33
-
34
-
35
-
36
-
37
-
38
-
39
-
40
-
41
-
42
-
43
-
44
-
45
-
46
-
47
-
48
-
49
-
50
-
51
-
52
-
53
-
54
-
55
-
56
-
57
-
58
-
59
-
60
-
61
-
62
-
63
-
64
-
65
-
66
-
67
-
68
-
69
-
70
-
71
-
72
-
73
-
74
-
75
-
76
-
77
-
78
-
79
-
80
-
81
-
82
-
83
-
84
-
85
-
86
-
87
-
88
-
89
-
90
-
91
-
92
-
 93
93 -
 94
94 -
 95
95 -
 96
96 -
 97
97 -
 98
98 -
 99
99 -
 100
100 -
 101
101 -
 102
102 -
 103
103 -
104
-
105
-
106
-
107
-
108
-
109
-
110
-
111
-
112
-
113
-
114
-
115
-
116
-
117
-
118
-
119
-
120
-
121
-
122
-
123
-
124
-
125
-
126
-
127
-
128
-
129
 |
 |