Pioneer DVR-550H-S Operating Instructions - Page 43
Press TIMER REC to display the Timer
 |
UPC - 012562852980
View all Pioneer DVR-550H-S manuals
Add to My Manuals
Save this manual to your list of manuals |
Page 43 highlights
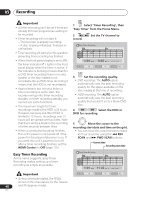
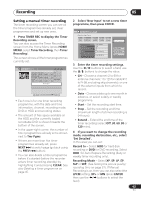
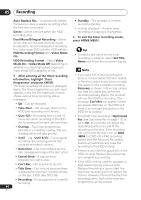
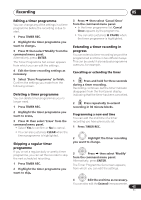
Recording 05 Setting a manual timer recording The timer recording screen you can see all the timer programmes already set, clear programmes and set up new ones. 1 Press TIMER REC to display the Timer Recording screen. You can also access the Timer Recording screen from the Home Menu (press HOME MENU, select Timer Recording, then Timer Recording). This screen shows all the timer programmes currently set. Timer Programme View Manhattan Open Tennis 3/26 SUN 6:00PM - 7:00PM World Journey 3/27 MON 7:30PM - 9:00PM Flower MON - FRI 1:30PM - 2:00PM 3/26 SUN 3:00PM Tmr Pgms 3/32 OK 10ch OK 4ch Until 4/20 8ch New Input HDD Remain DVD Remain 59h59m(SP) 1h59m(SP) • Each row is for one timer recording programme, with the date and time information, channel, recording mode, DVD or HDD and recording status. • The amount of free space available on the HDD and the currently loaded recordable DVD is shown towards the bottom of the screen. • In the upper-right corner, the number of timer programmes already set is shown next to Tmr Pgms. • If there are more than five timer programmes already set, press NEXT to switch page (go back using the PREV button). • You can also delete a timer programme before it's started (before the recorder enters timer recording standby) by highlighting it and pressing CLEAR. See also Deleting a timer programme on page 45. 2 Select 'New Input' to set a new timer programme, then press ENTER. Timer Programme Set Manhattan Open Tennis CH Date Start Stop Extend 10ch EVERYDAY 6:00PM 7:00PM 30 min Detailed Settings Record To Recording Mode Auto Replace Rec. Genre Dual Mono Recording HDD Recording Format Enter Details HDD XP On No Category L Video Mode On Store Programme Set Detailed Set Title Name Cancel 3 Enter the timer recording settings. Use the / buttons to select a field; use the / buttons to change the value. • CH - Choose a channel (2 to 69 for antenna channels; 1 to 125 for cable/Pr1 to Pr 99, excluding skip channels), or one of the external inputs from which to record. • Date - Choose a date up to one month in advance, or select a daily or weekly programme. • Start - Set the recording start time. • Stop - Set the recording end time (maximum length of a timer recording is 24 hours). • Extend - Extend the end time of the timer recording (select Off, 30, 60, 90 or 120 mins). 4 If you want to change the recording mode, recording destination, etc., select 'Set Detailed'. In this area you can set: Record to - Select HDD for hard disk recording or DVD for DVD recording. Select HDD for Auto Replace Recording (daily or weekly timer recording only). Recording Mode - Select XP, SP, LP, EP, SLP or SEP, (See Setting the picture quality/ recording time on page 37). If Manual Recording is on, then you can also select the LPCM setting, XP+ or MN (press ENTER then use the / buttons to select the level). 43 En
-
 1
1 -
2
-
3
-
4
-
5
-
6
-
7
-
8
-
9
-
10
-
11
-
12
-
13
-
14
-
15
-
16
-
17
-
18
-
19
-
20
-
21
-
22
-
23
-
24
-
25
-
26
-
27
-
28
-
29
-
30
-
31
-
32
-
33
-
34
-
35
-
36
-
37
-
 38
38 -
 39
39 -
 40
40 -
 41
41 -
 42
42 -
 43
43 -
 44
44 -
 45
45 -
 46
46 -
 47
47 -
 48
48 -
49
-
50
-
51
-
52
-
53
-
54
-
55
-
56
-
57
-
58
-
59
-
60
-
61
-
62
-
63
-
64
-
65
-
66
-
67
-
68
-
69
-
70
-
71
-
72
-
73
-
74
-
75
-
76
-
77
-
78
-
79
-
80
-
81
-
82
-
83
-
84
-
85
-
86
-
87
-
88
-
89
-
90
-
91
-
92
-
93
-
94
-
95
-
96
-
97
-
98
-
99
-
100
-
101
-
102
-
103
-
104
-
105
-
106
-
107
-
108
-
109
-
110
-
111
-
112
-
113
-
114
-
115
-
116
-
117
-
118
-
119
-
120
-
121
-
122
-
123
-
124
-
125
-
126
-
127
-
128
-
129
-
130
-
131
-
132
-
133
-
134
-
135
-
136
-
137
 |
 |