Pioneer DVR-550H-S Operating Instructions - Page 94
The PhotoViewer, Reloading files from a disc or, USB device, Importing files to the HDD
 |
UPC - 012562852980
View all Pioneer DVR-550H-S manuals
Add to My Manuals
Save this manual to your list of manuals |
Page 94 highlights
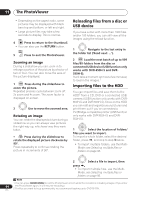
11 The PhotoViewer • Depending on the aspect ratio, some pictures may be displayed with black bars top and bottom, or left and right. • Large picture files may take a few seconds to display. This is normal. STOP 4 Press to return to the thumbnail. • You can also use the RETURN button. HOME MENU 5 Press to exit the PhotoViewer. Zooming an image During a slideshow you can zoom in to enlarge a portion of the picture by a factor of two or four. You can also move the area of the picture displayed. 1 ENTER Press during the slideshow to zoom the picture. Repeated presses cycle between zoom off, 2x zoom and 4x zoom. The zoom factor is displayed on-screen. 2 Use to move the zoomed area. Rotating an image You can rotate the displayed picture during a slideshow so you can always view pictures the right way up, whichever way they were taken. ANGLE • Press during the slideshow to rotate the displayed picture clockwise by 90º. Press repeatedly to continue rotating the picture in increments of 90º. Reloading files from a disc or USB device If you have a disc with more than 1000 files and/or 100 folders, you can still view all the images using the reload function. 1 Navigate to the last entry in the folder list ('Read next: ...'). 2 ENTER Load the next batch of up to 999 files/99 folders from the disc or connected USB device (USB function only works with DVR-650H-S and DVR550H-S). It will take a moment (at most a few minutes) to load in the images.1 Importing files to the HDD You can import files and save them to the HDD2 from a CD, DVD or a connected USB camera (USB function only works with DVR650H-S and DVR-550H-S). Once on the HDD you can edit and organize your pictures and print them out if you've connected a PictBridge-compatible printer (USB function only works with DVR-650H-S and DVR550H-S). ENTER 1 Select the location of folders/ files you want to import. To import a whole folder, select the desired folder, press , and skip to step 3 below. • To import multiple folders, use the MultiMode; see Selecting multiple files or folders on page 95. 2 Select a file to import, then press . • To import multiple files, use the MultiMode; see Selecting multiple files or folders on page 95. Note 1 You can press HOME MENU to exit the PhotoViewer screen while the recorder is reloading images. (If you enter 94 the PhotoViewer again, it will resume reloading.) 2 For files you want to keep permanently, we recommend backing up to DVD-R/-RW. En
-
 1
1 -
2
-
3
-
4
-
5
-
6
-
7
-
8
-
9
-
10
-
11
-
12
-
13
-
14
-
15
-
16
-
17
-
18
-
19
-
20
-
21
-
22
-
23
-
24
-
25
-
26
-
27
-
28
-
29
-
30
-
31
-
32
-
33
-
34
-
35
-
36
-
37
-
38
-
39
-
40
-
41
-
42
-
43
-
44
-
45
-
46
-
47
-
48
-
49
-
50
-
51
-
52
-
53
-
54
-
55
-
56
-
57
-
58
-
59
-
60
-
61
-
62
-
63
-
64
-
65
-
66
-
67
-
68
-
69
-
70
-
71
-
72
-
73
-
74
-
75
-
76
-
77
-
78
-
79
-
80
-
81
-
82
-
83
-
84
-
85
-
86
-
87
-
88
-
 89
89 -
 90
90 -
 91
91 -
 92
92 -
 93
93 -
 94
94 -
 95
95 -
 96
96 -
 97
97 -
 98
98 -
 99
99 -
100
-
101
-
102
-
103
-
104
-
105
-
106
-
107
-
108
-
109
-
110
-
111
-
112
-
113
-
114
-
115
-
116
-
117
-
118
-
119
-
120
-
121
-
122
-
123
-
124
-
125
-
126
-
127
-
128
-
129
-
130
-
131
-
132
-
133
-
134
-
135
-
136
-
137
 |
 |
