Pioneer VSX-520-K Owner's Manual - Page 24
Using the component video jacks, Connecting other audio components, If necessary - manuals
 |
UPC - 884938108843
View all Pioneer VSX-520-K manuals
Add to My Manuals
Save this manual to your list of manuals |
Page 24 highlights
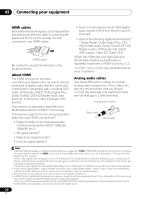
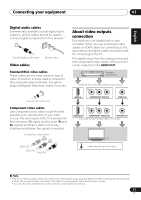
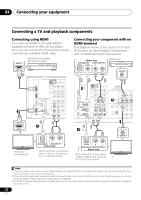
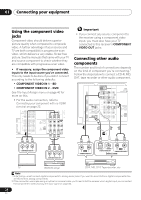
03 Connecting your equipment Using the component video jacks Component video should deliver superior picture quality when compared to composite video. A further advantage (if your source and TV are both compatible) is progressive-scan video, which delivers a very stable, flicker-free picture. See the manuals that came with your TV and source component to check whether they are compatible with progressive-scan video. • If necessary, assign the component video inputs to the input source you've connected. This only needs to be done if you didn't connect according to the following defaults: • COMPONENT VIDEO IN 1 - BD • COMPONENT VIDEO IN 2 - DVD See The Input Assign menu on page 40 for more on this. • For the audio connection, refer to Connecting your component with no HDMI terminal on page 22. R PRE OUT CD CD-R/TAPE DVR/VCR L SSIGNABLE IN IN R SSIGNABLE 12 TV/SAT DVD L IN R AUDIO BD IN MONITOR OUT DVD IN BD IN ANTENNA PR PB Y MONITOR FM OUT UNBAL 75 IN 2 (DVD) AM LOOP COMPONENT VIDEO IN 1 (BD) ASSIGNABLE 12 Important • If you connect any source component to the receiver using a component video input, you must also have your TV connected to this receiver's COMPONENT VIDEO OUT jacks. Connecting other audio components The number and kind of connections depends on the kind of component you're connecting.1 Follow the steps below to connect a CD-R, MD, DAT, tape recorder or other audio component.2 SUBWOOFER PRE OUT CD-R/TAPE DVR/VCR SURR BACK / BD FRONT HEIGHT L (Single) OUT R DVD PRE OUT CD CD-R/TAPE DVR/VCR L COAXIAL ASSIGNABLE TV/SAT IN 1 (CD) OPTICAL IN IN 2 OUT (DVR/VCR) IN 1 (CD-R/TAPE) HDMI ASSIGNABLE 12 IN R TV/SAT DVD L IN R AUDIO IN BD IN ADAPTER (OUTPUT 5 V 1 M ANTENNA FM UNBAL 75 AM LOOP 2 PR PB Y COMPONENT VIDEO IN PR PB Y COMPONENT VIDEO OUT R REC L ANALOG AUDIO IN OPTICAL COAXIAL R PLAY L DIGITAL AUDIO OUT ANALOG AUDIO OUT Select one TV BD/DVD player CD-R, MD, DAT, Tape recorder, etc. Note 1 Note that you must connect digital components to analog audio jacks if you want to record to/from digital components (like an MD) to/from analog components. 2 If the connection was made using an optical or a coaxial cable, you'll need to tell the receiver which digital input you connected the component to (see Choosing the input signal on page 36). 24 En
-
 1
1 -
2
-
3
-
4
-
5
-
6
-
7
-
8
-
9
-
10
-
11
-
12
-
13
-
14
-
15
-
16
-
17
-
18
-
 19
19 -
 20
20 -
 21
21 -
 22
22 -
 23
23 -
 24
24 -
 25
25 -
 26
26 -
 27
27 -
 28
28 -
 29
29 -
30
-
31
-
32
-
33
-
34
-
35
-
36
-
37
-
38
-
39
-
40
-
41
-
42
-
43
-
44
-
45
-
46
-
47
-
48
-
49
-
50
-
51
-
52
-
53
-
54
-
55
-
56
-
57
-
58
-
59
-
60
-
61
-
62
-
63
-
64
-
65
-
66
-
67
-
68
-
69
-
70
-
71
-
72
-
73
-
74
-
75
-
76
-
77
-
78
-
79
-
80
-
81
-
82
-
83
-
84
-
85
-
86
-
87
-
88
-
89
-
90
-
91
-
92
-
93
-
94
-
95
-
96
-
97
-
98
-
99
-
100
-
101
-
102
-
103
-
104
-
105
-
106
-
107
-
108
-
109
-
110
-
111
-
112
-
113
-
114
-
115
-
116
-
117
-
118
-
119
-
120
-
121
-
122
-
123
-
124
-
125
-
126
-
127
-
128
-
129
-
130
-
131
-
132
-
133
-
134
-
135
-
136
-
137
-
138
-
139
-
140
-
141
-
142
-
143
-
144
-
145
-
146
-
147
-
148
-
149
-
150
-
151
-
152
-
153
-
154
-
155
-
156
-
157
-
158
-
159
-
160
 |
 |