Pioneer VSX-520-K Owner's Manual - Page 37
The System Setup menu, Using the System Setup menu, Manual speaker setup
 |
UPC - 884938108843
View all Pioneer VSX-520-K manuals
Add to My Manuals
Save this manual to your list of manuals |
Page 37 highlights
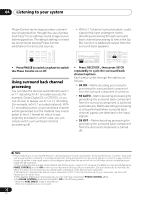
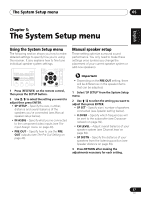
The System Setup menu 05 English Français Español PRESET Chapter 5: The System Setup menu Using the System Setup menu The following section shows you how to make detailed settings to specify how you're using the receiver. It also explains how to fine-tune individual speaker system settings. RECEIVER SLEEP TV SOURCE CONTROL AUDIO PARAMETER TOP MENU TUNE TUNER EDIT MASTER TOOLS VOLUME MENU PRESET RECEIVER INPUT SELECT DTV/TV INPUT BD DVD TV ENTER HOME MENU SETUP TUNE BAND RETURN 1 Press RECEIVER on the remote control, then press the SETUP button. 2 Use / to select the setting you want to adjust then press ENTER. • SP SETUP - Specify the size, number, distance and overall balance of the speakers you've connected (see Manual speaker setup below). • IN ASSIG - Specify what you've connected to the component video inputs (see The Input Assign menu on page 40). • PRE OUT - Specify how to use the PRE OUT outputs (see The Pre Out Setting on page 40). Manual speaker setup These setting optimize surround sound performance. You only need to make these settings once (unless you change the placement of your current speaker system or add new speakers). Important • Depending on the PRE OUT setting, there will be differences in the speaker items that can be adjusted. 1 Select 'SP SETUP' from the System Setup menu. 2 Use / to select the setting you want to adjust then press ENTER. • SP SET - Specify size / number of speakers connected (see Speaker setting below). • X.OVER - Specify which frequencies will be sent to the subwoofer (see Crossover network on page 39). • CH LEVEL - Adjust overall balance of your speaker system (see Channel level on page 39). • SP DISTN - Specify the distance of your speakers from the listening position (see Speaker distance on page 39). 3 Press RETURN after making the adjustments necessary for each setting. 37 En
-
 1
1 -
2
-
3
-
4
-
5
-
6
-
7
-
8
-
9
-
10
-
11
-
12
-
13
-
14
-
15
-
16
-
17
-
18
-
19
-
20
-
21
-
22
-
23
-
24
-
25
-
26
-
27
-
28
-
29
-
30
-
31
-
 32
32 -
 33
33 -
 34
34 -
 35
35 -
 36
36 -
 37
37 -
 38
38 -
 39
39 -
 40
40 -
 41
41 -
 42
42 -
43
-
44
-
45
-
46
-
47
-
48
-
49
-
50
-
51
-
52
-
53
-
54
-
55
-
56
-
57
-
58
-
59
-
60
-
61
-
62
-
63
-
64
-
65
-
66
-
67
-
68
-
69
-
70
-
71
-
72
-
73
-
74
-
75
-
76
-
77
-
78
-
79
-
80
-
81
-
82
-
83
-
84
-
85
-
86
-
87
-
88
-
89
-
90
-
91
-
92
-
93
-
94
-
95
-
96
-
97
-
98
-
99
-
100
-
101
-
102
-
103
-
104
-
105
-
106
-
107
-
108
-
109
-
110
-
111
-
112
-
113
-
114
-
115
-
116
-
117
-
118
-
119
-
120
-
121
-
122
-
123
-
124
-
125
-
126
-
127
-
128
-
129
-
130
-
131
-
132
-
133
-
134
-
135
-
136
-
137
-
138
-
139
-
140
-
141
-
142
-
143
-
144
-
145
-
146
-
147
-
148
-
149
-
150
-
151
-
152
-
153
-
154
-
155
-
156
-
157
-
158
-
159
-
160
 |
 |