Pioneer VSX-520-K Owner's Manual - Page 6
Flow of settings on the receiver - manual
 |
UPC - 884938108843
View all Pioneer VSX-520-K manuals
Add to My Manuals
Save this manual to your list of manuals |
Page 6 highlights
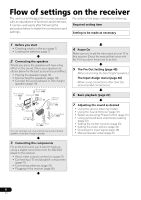
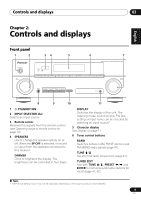
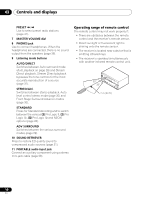
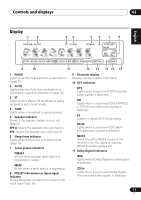
Flow of settings on the receiver The unit is a full-fledged AV receiver equipped with an abundance of functions and terminals. It can be used easily after following the procedure below to make the connections and settings. The colors of the steps indicate the following: Required setting item Setting to be made as necessary 1 Before you start • Checking what's in the box (page 7) • Loading the batteries (page 7) 2 Connecting the speakers Where you place the speakers will have a big effect on the sound. Place your speakers as shown below for the best surround sound effect. • Placing the speakers (page 16) • Connecting the speakers (page 18) • Connect the surround back or front height speakers (page 19) *Front Height Left (FHL) *Front Height Right (FHR) Subwoofer (SW) Front Right (R) Front Left (L) Listening position Surround Right (SR) Center (C) Surround Left (SL) *Surround Back Right (SBR) *Surround Back Left (SBL) You can connect only one of either the surround back speaker or the front height speaker. 3 Connecting the components For surround sound, you'll want to hook up using a digital connection from the BD/DVD player to the receiver. • About video outputs connection (page 21) • Connecting a TV and playback components (page 22) • Connecting antennas (page 25) • Plugging in the receiver (page 26) 4 Power On Make sure you've set the video input on your TV to this receiver. Check the manual that came with the TV if you don't know how to do this. 5 The Pre Out Setting (page 40) (When connecting the front height speakers.) The Input Assign menu (page 40) (When using connections other than the recommended connections.) 6 Basic playback (page 27) 7 Adjusting the sound as desired • Using the various listening modes • Using the Sound Retriever (page 31) • Better sound using Phase Control (page 31) • Using surround back channel processing (page 32) • Setting the Up Mix function (page 33) • Setting the Audio options (page 33) • Choosing the input signal (page 36) • Manual speaker setup (page 37) 6 En
-
 1
1 -
 2
2 -
 3
3 -
 4
4 -
 5
5 -
 6
6 -
 7
7 -
 8
8 -
 9
9 -
 10
10 -
 11
11 -
 12
12 -
13
-
14
-
15
-
16
-
17
-
18
-
19
-
20
-
21
-
22
-
23
-
24
-
25
-
26
-
27
-
28
-
29
-
30
-
31
-
32
-
33
-
34
-
35
-
36
-
37
-
38
-
39
-
40
-
41
-
42
-
43
-
44
-
45
-
46
-
47
-
48
-
49
-
50
-
51
-
52
-
53
-
54
-
55
-
56
-
57
-
58
-
59
-
60
-
61
-
62
-
63
-
64
-
65
-
66
-
67
-
68
-
69
-
70
-
71
-
72
-
73
-
74
-
75
-
76
-
77
-
78
-
79
-
80
-
81
-
82
-
83
-
84
-
85
-
86
-
87
-
88
-
89
-
90
-
91
-
92
-
93
-
94
-
95
-
96
-
97
-
98
-
99
-
100
-
101
-
102
-
103
-
104
-
105
-
106
-
107
-
108
-
109
-
110
-
111
-
112
-
113
-
114
-
115
-
116
-
117
-
118
-
119
-
120
-
121
-
122
-
123
-
124
-
125
-
126
-
127
-
128
-
129
-
130
-
131
-
132
-
133
-
134
-
135
-
136
-
137
-
138
-
139
-
140
-
141
-
142
-
143
-
144
-
145
-
146
-
147
-
148
-
149
-
150
-
151
-
152
-
153
-
154
-
155
-
156
-
157
-
158
-
159
-
160
 |
 |
