Pioneer X-SMC4-K Operating Instructions - Page 30
Clock Adjustment - software update
 |
View all Pioneer X-SMC4-K manuals
Add to My Manuals
Save this manual to your list of manuals |
Page 30 highlights
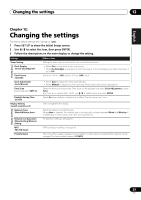
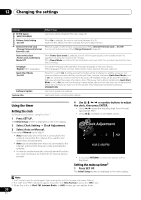
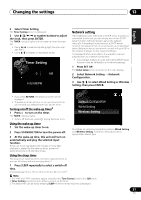
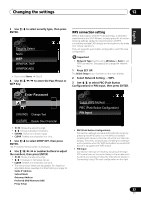
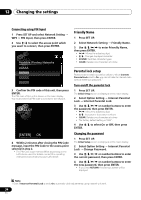
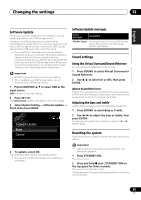
12 Changing the settings Option Setting Settings BT PIN Select (0000/1234/8888) Volume Limit Setting (On/Off) Internet Parental Lock (Change Password/Internet Parental Lock) Auto mode select (Power Save mode/Demo Mode/Off) Language (English/Other languages) Quick Start Mode (On/Off) Software Update System Info What it does Use this to set the Bluetooth PIN code. (page 19) When On is selected, the volume can be set between 0 to 30. Each time this setting has been changed, the volume becomes to 0. Restricts usage of internet radio using password. Select Internet Parental Lock to On/Off. You can set up the password from Change Password. (page 34) When Power Save mode is selected, the unit will be automatically in the standby mode if no operation has done for more than 30 minutes. When Demo Mode is selected, the demonstration screen will start if no operation has done for more than 5 minutes. Change the language of the operation messages displayed on the main display. Other languages: French, German, Netherlands, Italian, Spanish, Russian, Japanese When this is set to On, the time required for bootup will be shortened. In addition, power-on will occur simultaneously when AirPlay is performed. Note, however, that when Quick Start Mode is set to On, the electrical current consumed in the power-off (standby) mode will be about the same as that required when the power is turned on. Also, if the power cord is disconnected while Quick Start Mode is set to On, the next time the plug is reconnected, about one minute warm-up will be required before the unit responds. Wait for one minute after reconnecting the cord before pressing STANDBY/ON. Use this to update unit software. Use this to check unit information details. Using the timer Setting the clock Setting the clock before using the timer.1 1 Press SET UP. The Initial Setup screen is displayed on the main display. 2 Select Clock Setting Clock Adjustment. 3 Select Auto or Manual. If you select Manual, go to step 4. • Auto works only when this unit is connected to the network. Connect to the network if you want to use automatic time adjustment. • Auto can be selected even when not connected to the Internet, but the clock time will not be automatically updated. • In order to use the automatic clock adjustment function, you must conclude a contract with an Internet service provider. 4 Use or number buttons to adjust the clock, then press ENTER. • Using / moves the adjusting digit (hour/minute/ second/AM, PM2). • Using / increases or decreases values. Clock Adjustment 2 21 0 AM H:M:S AM/PM • If you press RETURN, the previous screen will be displayed. Setting the wake-up timer3 1 Press SET UP. The Initial Setup screen is displayed on the main display. Note 1 You'll need to set the clock again if you unplug the unit (or in case of a power failure). 2 The "AM" and "PM" indicators appear only when the Time Format is set to the 12H mode. 3 When the unit is in iPod, FM, Internet Radio, or AUX modes, you can set the timer. 30 En
-
 1
1 -
2
-
3
-
4
-
5
-
6
-
7
-
8
-
9
-
10
-
11
-
12
-
13
-
14
-
15
-
16
-
17
-
18
-
19
-
20
-
21
-
22
-
23
-
24
-
 25
25 -
 26
26 -
 27
27 -
 28
28 -
 29
29 -
 30
30 -
 31
31 -
 32
32 -
 33
33 -
 34
34 -
 35
35 -
36
-
37
-
38
-
39
-
40
-
41
-
42
-
43
-
44
-
45
-
46
-
47
-
48
-
49
-
50
-
51
-
52
-
53
-
54
-
55
-
56
-
57
-
58
-
59
-
60
-
61
-
62
-
63
-
64
-
65
-
66
-
67
-
68
-
69
-
70
-
71
-
72
-
73
-
74
-
75
-
76
-
77
-
78
-
79
-
80
-
81
-
82
-
83
-
84
-
85
-
86
-
87
-
88
-
89
-
90
-
91
-
92
 |
 |