Pioneer X-SMC4-K Operating Instructions - Page 32
Static IP Address
 |
View all Pioneer X-SMC4-K manuals
Add to My Manuals
Save this manual to your list of manuals |
Page 32 highlights
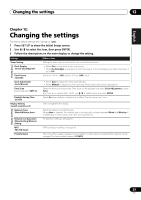
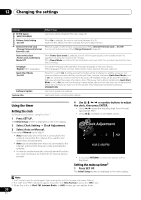
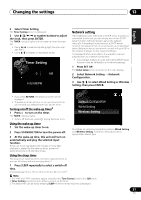
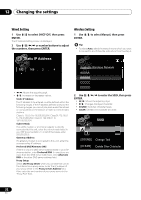
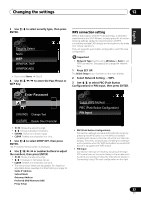
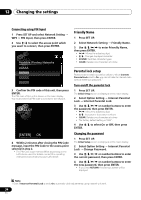
12 Changing the settings Wired Setting 1 Use / to select DHCP Off, then press ENTER. The IP address setting screen is displayed. 2 Use or number buttons to adjust the numbers, then press ENTER. Wireless Setting 1 Use / to select Manual, then press ENTER. Tip • To select Auto, select the network name which you want to connect to and follow the instruction from the step 4. Static IP Address 192 . 168 . 2 . 4 Moves the adjusting digit Increases or decreases values. Static IP Address The IP address to be entered must be defined within the following ranges. If the IP address defined is beyond the following ranges, you cannot play back audio files stored on components on the network or listen to Internet radio stations. Class A: 10.0.0.1 to 10.255.255.254 / Class B: 172.16.0.1 to 172.31.255.254 / Class C: 192.168.0.1 to 192.168.255.254 Subnet Mask If an xDSL modem or a terminal adapter is directly connected to this unit, enter the subnet mask listed in your ISP documentation. In most of the cases, enter 255.255.255.0. Gateway Address If a gateway (router) is connected to this unit, enter the corresponding IP address. Preferred DNS/Alternate DNS If there is only one DNS server address listed in your ISP documentation, enter Preferred DNS. In case there are more than two DNS server addresses, enter Alternate DNS in the other DNS server address field. Proxy Setup Select Use Proxy Server when you connect this unit to the Internet via a proxy server. Enter the IP address of your proxy server in the Proxy Server Address field. Also, enter the port number of your proxy server in the 'Proxy Port' field. Available Wireless Network AAAAA BBBBB CCCCC DDDDD 2 Use to enter the SSID, then press ENTER. Moves the adjusting digit Changes displayed character. • SOUND: Switches character types. • CLEAR: Deletes one character at a time. SSID [SOUND] Change Text [CLEAR] Delete One Character 32 En
-
 1
1 -
2
-
3
-
4
-
5
-
6
-
7
-
8
-
9
-
10
-
11
-
12
-
13
-
14
-
15
-
16
-
17
-
18
-
19
-
20
-
21
-
22
-
23
-
24
-
25
-
26
-
 27
27 -
 28
28 -
 29
29 -
 30
30 -
 31
31 -
 32
32 -
 33
33 -
 34
34 -
 35
35 -
 36
36 -
 37
37 -
38
-
39
-
40
-
41
-
42
-
43
-
44
-
45
-
46
-
47
-
48
-
49
-
50
-
51
-
52
-
53
-
54
-
55
-
56
-
57
-
58
-
59
-
60
-
61
-
62
-
63
-
64
-
65
-
66
-
67
-
68
-
69
-
70
-
71
-
72
-
73
-
74
-
75
-
76
-
77
-
78
-
79
-
80
-
81
-
82
-
83
-
84
-
85
-
86
-
87
-
88
-
89
-
90
-
91
-
92
 |
 |
