Pioneer X-SMC4-K Operating Instructions - Page 33
Enter Password
 |
View all Pioneer X-SMC4-K manuals
Add to My Manuals
Save this manual to your list of manuals |
Page 33 highlights
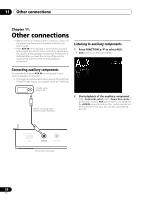
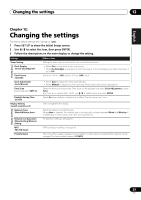
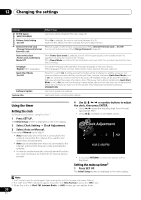
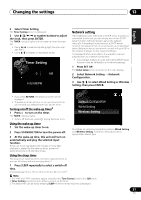
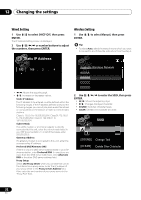
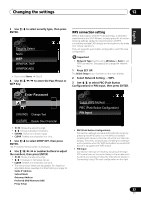
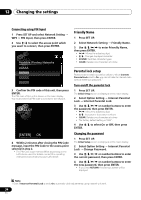
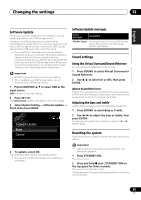
Changing the settings 12 English Français Español 3 Use / to select security type, then press ENTER. Security Select None WEP WPAPSK TKIP WPAPSK AES • If you select None. Step 5 4 Use to enter the Pass Phrase or WEP Key. WPS connection setting WPS is abbreviation of Wi-Fi Protected Setup. A standard established by the Wi-Fi Alliance industry group for a function allowing settings related to interconnection of WPS compatible wireless LAN devices and encryption to be made with simple operations. This unit supports push-button configuration and PIN code configuration. Important • Network Type must be set to Wireless or Auto to use WPS connection. See page 29 to change the network type. 1 Press SET UP. The Initial Setup screen is shown on the main display. 2 Select Network Setting WPS. 3 Use / to select PBC (Push Button Configuration) or PIN Input, then press ENTER. Enter Password [SOUND] Change Text [CLEAR] Delete One Character Moves the adjusting digit Changes displayed character. • SOUND: Switches character types. • CLEAR: Deletes one character at a time. 5 Use / to select DHCP OFF, then press ENTER. The IP address setting screen is displayed. 6 Use or number buttons to adjust the numbers, then press ENTER. Moves the adjusting digit Increases or decreases values. • CLEAR: Deletes one character at a time. • The items shown below are adjustable. For details on adjustable items, see step 2 in Wired Setting on page 32. Static IP Address Subnet Mask Gateway Address Preferred DNS/Alternate DNS Proxy Setup Select WPS Method PBC (Push Button Configuration) PIN Input • PBC (Push Button Configuration) Connection settings are made automatically simply by pressing the WPS buttons on the WPS compatible wireless LAN device. Follow the instructions on the main display. This is the simplest way of making the settings, and is possible when the WPS compatible wireless LAN device is equipped with WPS button. • PIN Input Connection settings are made by inputting the 8-digit PIN code shown on the main display to the access point to which you selected. Follow the instructions shown in Connecting using PIN code configuration on the right. 33 En
-
 1
1 -
2
-
3
-
4
-
5
-
6
-
7
-
8
-
9
-
10
-
11
-
12
-
13
-
14
-
15
-
16
-
17
-
18
-
19
-
20
-
21
-
22
-
23
-
24
-
25
-
26
-
27
-
 28
28 -
 29
29 -
 30
30 -
 31
31 -
 32
32 -
 33
33 -
 34
34 -
 35
35 -
 36
36 -
 37
37 -
 38
38 -
39
-
40
-
41
-
42
-
43
-
44
-
45
-
46
-
47
-
48
-
49
-
50
-
51
-
52
-
53
-
54
-
55
-
56
-
57
-
58
-
59
-
60
-
61
-
62
-
63
-
64
-
65
-
66
-
67
-
68
-
69
-
70
-
71
-
72
-
73
-
74
-
75
-
76
-
77
-
78
-
79
-
80
-
81
-
82
-
83
-
84
-
85
-
86
-
87
-
88
-
89
-
90
-
91
-
92
 |
 |
