Ricoh Aficio SP 100SU e User Guide - Page 10
Interior, Control Panel, The actual control panel may look different from the illustration below
 |
View all Ricoh Aficio SP 100SU e manuals
Add to My Manuals
Save this manual to your list of manuals |
Page 10 highlights
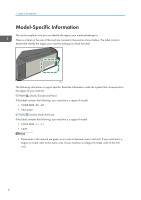
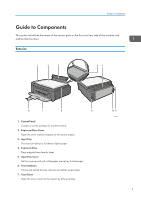
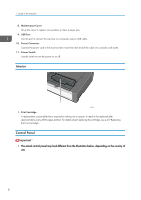
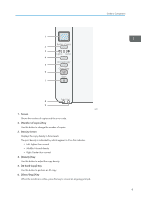
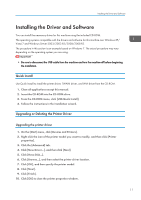
1. Guide to the Machine 8. Maintenance Cover Lift up this cover to replace consumables or clear a paper jam. 9. USB Port Use this port to connect the machine to a computer using a USB cable. 10. Power Connector Connect the power cord to the machine here. Insert the other end of the cable into a nearby wall outlet. 11. Power Switch Use this switch to turn the power on or off. Interior 1 CHZ004 1. Print Cartridge A replacement consumable that is required to make prints on paper. It needs to be replaced after approximately every 2000 pages printed. For details about replacing the cartridge, see p.45 "Replacing the Print Cartridge". Control Panel • The actual control panel may look different from the illustration below, depending on the country of use. 8
-
 1
1 -
2
-
3
-
4
-
 5
5 -
 6
6 -
 7
7 -
 8
8 -
 9
9 -
 10
10 -
 11
11 -
 12
12 -
 13
13 -
 14
14 -
 15
15 -
16
-
17
-
18
-
19
-
20
-
21
-
22
-
23
-
24
-
25
-
26
-
27
-
28
-
29
-
30
-
31
-
32
-
33
-
34
-
35
-
36
-
37
-
38
-
39
-
40
-
41
-
42
-
43
-
44
-
45
-
46
-
47
-
48
-
49
-
50
-
51
-
52
-
53
-
54
-
55
-
56
-
57
-
58
-
59
-
60
-
61
-
62
-
63
-
64
-
65
-
66
-
67
-
68
-
69
-
70
-
71
-
72
-
73
-
74
-
75
-
76
 |
 |
