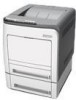
Ricoh C311N User Guide - Page 43
Attaching Memory Unit Type F 256MB (DDR-SDRAM Module), Turn off the power - printer driver
 |
UPC - 026649064661
View all Ricoh C311N manuals
Add to My Manuals
Save this manual to your list of manuals |
Page 43 highlights
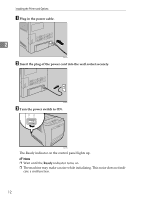
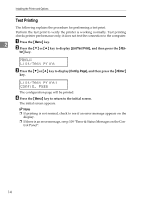
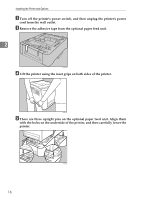
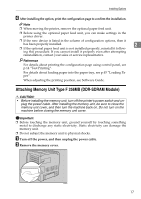
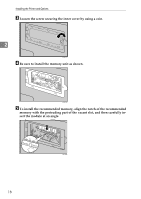
Installing Options F After installing the option, print the configuration page to confirm the installation. Note ❒ When moving the printer, remove the optional paper feed unit. ❒ Before using the optional paper feed unit, you can make settings in the printer driver. ❒ If the new device is listed in the column of configuration options, then it has been properly installed. 2 ❒ If the optional paper feed unit is not installed properly, reinstall it follow- ing this procedure. If you cannot install it properly even after attempting reinstallation, contact your sales or service representative. Reference For details about printing the configuration page using control panel, see p.14 "Test Printing". For details about loading paper into the paper tray, see p.45 "Loading Paper". When adjusting the printing position, see Software Guide. Attaching Memory Unit Type F 256MB (DDR-SDRAM Module) R CAUTION: • Before installing the memory unit, turn off the printer's power switch and un- plug the power cable. After installing the memory unit, be sure to close the memory unit cover, and then turn the machine back on. Do not turn on the machine before closing the memory unit cover. Important ❒ Before touching the memory unit, ground yourself by touching something metal to discharge any static electricity. Static electricity can damage the memory unit. ❒ Do not subject the memory unit to physical shocks. A Turn off the power, and then unplug the power cable. B Remove the memory cover. ASI080S 17
-
 1
1 -
2
-
3
-
4
-
5
-
6
-
7
-
8
-
9
-
10
-
11
-
12
-
13
-
14
-
15
-
16
-
17
-
18
-
19
-
20
-
21
-
22
-
23
-
24
-
25
-
26
-
27
-
28
-
29
-
30
-
31
-
32
-
33
-
34
-
35
-
36
-
37
-
 38
38 -
 39
39 -
 40
40 -
 41
41 -
 42
42 -
 43
43 -
 44
44 -
 45
45 -
 46
46 -
 47
47 -
 48
48 -
49
-
50
-
51
-
52
-
53
-
54
-
55
-
56
-
57
-
58
-
59
-
60
-
61
-
62
-
63
-
64
-
65
-
66
-
67
-
68
-
69
-
70
-
71
-
72
-
73
-
74
-
75
-
76
-
77
-
78
-
79
-
80
-
81
-
82
-
83
-
84
-
85
-
86
-
87
-
88
-
89
-
90
-
91
-
92
-
93
-
94
-
95
-
96
-
97
-
98
-
99
-
100
-
101
-
102
-
103
-
104
-
105
-
106
-
107
-
108
-
109
-
110
-
111
-
112
-
113
-
114
-
115
-
116
-
117
-
118
-
119
-
120
-
121
-
122
-
123
-
124
-
125
-
126
-
127
-
128
-
129
-
130
-
131
-
132
-
133
-
134
-
135
-
136
-
137
-
138
-
139
-
140
-
141
-
142
-
143
-
144
-
145
-
146
-
147
-
148
-
149
-
150
-
151
-
152
-
153
-
154
-
155
-
156
-
157
-
158
-
159
-
160
-
161
-
162
-
163
-
164
-
165
-
166
-
167
-
168
-
169
-
170
-
171
-
172
-
173
-
174
-
175
-
176
-
177
-
178
-
179
-
180
-
181
-
182
-
183
-
184
-
185
-
186
-
187
-
188
-
189
-
190
-
191
-
192
-
193
-
194
-
195
-
196
-
197
-
198
-
199
-
200
-
201
-
202
-
203
-
204
-
205
-
206
-
207
-
208
-
209
-
210
-
211
-
212
-
213
-
214
-
215
-
216
-
217
-
218
-
219
-
220
-
221
-
222
-
223
-
224
-
225
-
226
-
227
-
228
-
229
-
230
-
231
-
232
-
233
-
234
-
235
-
236
-
237
-
238
-
239
-
240
-
241
-
242
-
243
-
244
-
245
-
246
-
247
-
248
-
249
-
250
-
251
-
252
-
253
-
254
-
255
-
256
-
257
-
258
-
259
-
260
-
261
-
262
-
263
-
264
-
265
-
266
-
267
-
268
-
269
-
270
-
271
-
272
-
273
-
274
-
275
-
276
-
277
-
278
-
279
-
280
-
281
-
282
-
283
-
284
-
285
-
286
-
287
-
288
-
289
-
290
-
291
-
292
-
293
-
294
-
295
-
296
-
297
-
298
-
299
-
300
-
301
-
302
-
303
-
304
-
305
-
306
 |
 |
