Ricoh C311N User Guide - Page 80
Setting a paper size by using the control panel
 |
UPC - 026649064661
View all Ricoh C311N manuals
Add to My Manuals
Save this manual to your list of manuals |
Page 80 highlights
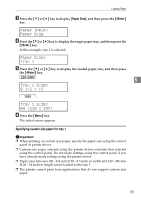
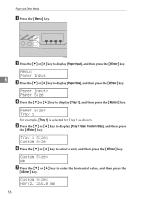
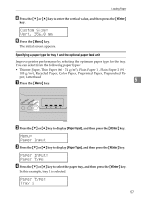
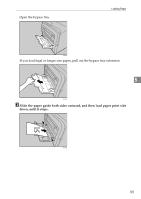
Paper and Other Media I Carefully push Tray 1 straight into the printer. ASI010S To avoid paper jams, make sure the tray is securely inserted. Note ❒ To reinsert the extender, you might have to push it with moderate force. 5 Reference For details about paper types supported by the printer, see p.37 "Paper Recommendations". For details about the paper settings, see Software Guide. Setting a paper size by using the control panel To load paper whose size cannot be selected automatically, set the paper size on the control panel. Follow the procedure described below to set the paper size. A Press the {Menu} key. ASI066S B Press the {T} or {U} key to display [Paper Input], and then press the {#Enter} key. Menu: Paper Input 54
-
 1
1 -
2
-
3
-
4
-
5
-
6
-
7
-
8
-
9
-
10
-
11
-
12
-
13
-
14
-
15
-
16
-
17
-
18
-
19
-
20
-
21
-
22
-
23
-
24
-
25
-
26
-
27
-
28
-
29
-
30
-
31
-
32
-
33
-
34
-
35
-
36
-
37
-
38
-
39
-
40
-
41
-
42
-
43
-
44
-
45
-
46
-
47
-
48
-
49
-
50
-
51
-
52
-
53
-
54
-
55
-
56
-
57
-
58
-
59
-
60
-
61
-
62
-
63
-
64
-
65
-
66
-
67
-
68
-
69
-
70
-
71
-
72
-
73
-
74
-
 75
75 -
 76
76 -
 77
77 -
 78
78 -
 79
79 -
 80
80 -
 81
81 -
 82
82 -
 83
83 -
 84
84 -
 85
85 -
86
-
87
-
88
-
89
-
90
-
91
-
92
-
93
-
94
-
95
-
96
-
97
-
98
-
99
-
100
-
101
-
102
-
103
-
104
-
105
-
106
-
107
-
108
-
109
-
110
-
111
-
112
-
113
-
114
-
115
-
116
-
117
-
118
-
119
-
120
-
121
-
122
-
123
-
124
-
125
-
126
-
127
-
128
-
129
-
130
-
131
-
132
-
133
-
134
-
135
-
136
-
137
-
138
-
139
-
140
-
141
-
142
-
143
-
144
-
145
-
146
-
147
-
148
-
149
-
150
-
151
-
152
-
153
-
154
-
155
-
156
-
157
-
158
-
159
-
160
-
161
-
162
-
163
-
164
-
165
-
166
-
167
-
168
-
169
-
170
-
171
-
172
-
173
-
174
-
175
-
176
-
177
-
178
-
179
-
180
-
181
-
182
-
183
-
184
-
185
-
186
-
187
-
188
-
189
-
190
-
191
-
192
-
193
-
194
-
195
-
196
-
197
-
198
-
199
-
200
-
201
-
202
-
203
-
204
-
205
-
206
-
207
-
208
-
209
-
210
-
211
-
212
-
213
-
214
-
215
-
216
-
217
-
218
-
219
-
220
-
221
-
222
-
223
-
224
-
225
-
226
-
227
-
228
-
229
-
230
-
231
-
232
-
233
-
234
-
235
-
236
-
237
-
238
-
239
-
240
-
241
-
242
-
243
-
244
-
245
-
246
-
247
-
248
-
249
-
250
-
251
-
252
-
253
-
254
-
255
-
256
-
257
-
258
-
259
-
260
-
261
-
262
-
263
-
264
-
265
-
266
-
267
-
268
-
269
-
270
-
271
-
272
-
273
-
274
-
275
-
276
-
277
-
278
-
279
-
280
-
281
-
282
-
283
-
284
-
285
-
286
-
287
-
288
-
289
-
290
-
291
-
292
-
293
-
294
-
295
-
296
-
297
-
298
-
299
-
300
-
301
-
302
-
303
-
304
-
305
-
306
 |
 |

Paper and Other Media
54
5
I
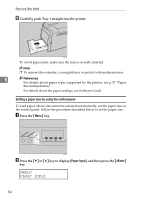
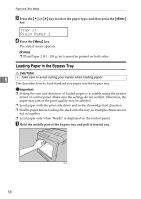
Carefully push Tray 1 straight into the printer.
To avoid paper jams, make sure the tray is securely inserted.
Note
❒
To reinsert the extender, you might have to push it with moderate force.
Reference
For details about paper types supported by the printer, see p.37 “Paper
Recommendations”.
For details about the paper settings, see Software Guide.
Setting a paper size by using the control panel
To load paper whose size cannot be selected automatically, set the paper size on
the control panel. Follow the procedure described below to set the paper size.
A
Press the
{
Menu
}
key.
B
Press the
{T}
or
{U}
key to display
[
Paper Input
]
, and then press the
{
#Enter
}
key.
ASI010S
ASI066S
Menu:
Paper Input