Ricoh IS330DC User Manual - Page 46
Short ID number
 |
UPC - 026649006722
View all Ricoh IS330DC manuals
Add to My Manuals
Save this manual to your list of manuals |
Page 46 highlights
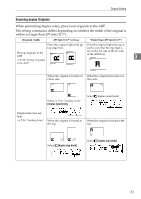
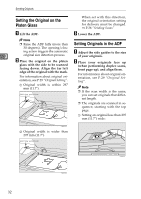
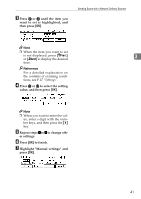
Sending Originals 6. Short ID number An ID number is assigned to each destination and sender. You can enter a short ID number and highlight the desired destination or sender. Note ❒ If the network TWAIN scanner screen is displayed, press [Cancel]. Note ❒ The short ID number is a number as- signed by the ScanRouter V2 Admin- istration Utility. For details on the C short ID number, see the ScanRouter Select the scan conditions. 3 V2 Administration Utility Help. The main scan conditions current- Sending Scans ly selected appear on the third line of the screen. If these settings are Scanned documents are delivered to a destination registered on the delivery server. satisfactory, proceed to specify a destination in step D. To change these settings or confirm detailed scan conditions, perform the fol- Note lowing procedure. ❒ Scanned originals are sent from Note this scanner to the delivery server, and then delivered to the specified destination using specific settings. ❒ The delivery method from the de- ❒ If you want to clear specified destinations and scan conditions then start from the beginning, press the {Reset} key. livery server to the different users varies according to the ScanRouter A Press [Menu]. V2 Administration Utility settings. A Set the original. Note ❒ For details on how to set origi- nals, see P.29 "Original Setting". B Confirm that the network deliv- ery scanner screen is displayed. B Press 0 or 1 to select the scan conditions of "User 1", "User 2" or "User 3", and then press [OK]. Note ❒ You can register the desired scan conditions in Users 1 to 3 in Scanner Features. If you register frequently used conditions beforehand, you can easily select scanning conditions. ⇒ P.17 "Scan Setup" 36
-
 1
1 -
2
-
3
-
4
-
5
-
6
-
7
-
8
-
9
-
10
-
11
-
12
-
13
-
14
-
15
-
16
-
17
-
18
-
19
-
20
-
21
-
22
-
23
-
24
-
25
-
26
-
27
-
28
-
29
-
30
-
31
-
32
-
33
-
34
-
35
-
36
-
37
-
38
-
39
-
40
-
 41
41 -
 42
42 -
 43
43 -
 44
44 -
 45
45 -
 46
46 -
 47
47 -
 48
48 -
 49
49 -
 50
50 -
 51
51 -
52
-
53
-
54
-
55
-
56
-
57
-
58
-
59
-
60
 |
 |
