Ricoh IS330DC User Manual - Page 48
Sender, Prev., Select, Deselect
 |
UPC - 026649006722
View all Ricoh IS330DC manuals
Add to My Manuals
Save this manual to your list of manuals |
Page 48 highlights
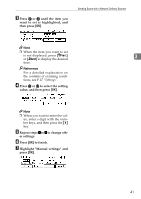
Sending Originals D When sending to multiple destinations, repeat steps B to C. E Once all of the destinations are specified, press [Exit]. B Highlight the name of the sender. If you know the short ID num- ber of the sender you want to Specified destinations are dis- send information to, enter it di- played on the second line of the rectly. If you do not know the 3 screen. If you specified multiple destinations, press 0 or 1 to short ID number, press [↑Prev.] or [↓Next] until the sender you view the other destinations. want appears, and then press 0 or 1 to highlight the sender. C Press [Select]. E Specify the sender (sender of the original). Note ❒ When a sender has been specified, this information is added to the scan data file. When the optional ScanRouter V2 Professional is used to send scan data files as e-mail, the sender information is automatically entered in the message sender field. ❒ You can omit the sender. If you do, the sender name will not appear in the sender column. ❒ You can only select one sender at a time from the sender list registered on the delivery server. A Press [Sender]. The name you highlight is selected as the sender and a ' mark appears in the check box next to it. If you press [Deselect], the selection is cancelled. D Press [Exit]. F Make original orientation set- tings. If originals are set in an upright ( ) position, perform the following procedure to change the original orientation settings when performing duplex scans. A Press [R1↔R2]. The short ID number and name of the senders registered on the delivery server appears. 38
-
 1
1 -
2
-
3
-
4
-
5
-
6
-
7
-
8
-
9
-
10
-
11
-
12
-
13
-
14
-
15
-
16
-
17
-
18
-
19
-
20
-
21
-
22
-
23
-
24
-
25
-
26
-
27
-
28
-
29
-
30
-
31
-
32
-
33
-
34
-
35
-
36
-
37
-
38
-
39
-
40
-
41
-
42
-
 43
43 -
 44
44 -
 45
45 -
 46
46 -
 47
47 -
 48
48 -
 49
49 -
 50
50 -
 51
51 -
 52
52 -
 53
53 -
54
-
55
-
56
-
57
-
58
-
59
-
60
 |
 |
