Ricoh IS330DC User Manual - Page 47
Specify the destination for delivery., Press, Highlight the name of a desti, nation. - scanner manual
 |
UPC - 026649006722
View all Ricoh IS330DC manuals
Add to My Manuals
Save this manual to your list of manuals |
Page 47 highlights
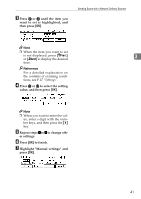
❒ To confirm the values registered in Users 1 to 3, highlight the desired scan condition and press [Status]. The Setting status screen appears and you can confirm the values for that condition. ⇒ P.22 "Checking the Delivery Result" ❒ When freely specifying registered setting values that you want to scan with, highlight "Manual settings" and press [Settings]. Set the desired settings in the Settings screen displayed for scan conditions. ⇒ P.40 "Making Scan Settings Manually" D Specify the destination for delivery. A Press [Dest.]. The short ID number and name for the destinations registered in the delivery server appear. Note ❒ If the address book (list of des- tinations and senders) is automatically updated, you can always use the latest version of the address book. If the contents of the address book change frequently, use the automatic update function. Sending Scans with a Network Delivery Scanner ❒ When the automatic address book update function is not ac- tive and the address book has been changed on the delivery server, you must restart the scanner to update the address book. If the address book changes on the delivery server, documents are not sent. Instead they are saved in the undeliv- ered data tray until the address book on this scanner is updated. 3 B Highlight the name of a desti- nation. If you know the short ID number of the desired destination, enter it directly with the number keys. If you do not know the short ID number, press [↑Prev.] or [↓Next] until the destination you want appears, then press 0 or 1 to highlight the destination. Note ❒ You can change the display sequence for destinations in the ScanRouter V2 Administration Utility settings. C Press [Select]. The highlighted name is selected as the destination and a ' mark appears in the check box next to the destination. If you press [Deselect], the selection is cancelled. 37
-
 1
1 -
2
-
3
-
4
-
5
-
6
-
7
-
8
-
9
-
10
-
11
-
12
-
13
-
14
-
15
-
16
-
17
-
18
-
19
-
20
-
21
-
22
-
23
-
24
-
25
-
26
-
27
-
28
-
29
-
30
-
31
-
32
-
33
-
34
-
35
-
36
-
37
-
38
-
39
-
40
-
41
-
 42
42 -
 43
43 -
 44
44 -
 45
45 -
 46
46 -
 47
47 -
 48
48 -
 49
49 -
 50
50 -
 51
51 -
 52
52 -
53
-
54
-
55
-
56
-
57
-
58
-
59
-
60
 |
 |
