Ricoh Priport HQ7000 PostScript Supplement - Page 36
Various Types of Printing, Printing on custom sized paper, Print, erties, Properties, Advanced
 |
View all Ricoh Priport HQ7000 manuals
Add to My Manuals
Save this manual to your list of manuals |
Page 36 highlights
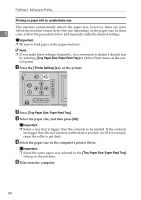
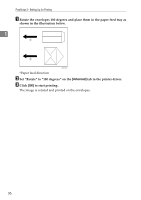
PostScript 3 - Setting Up for Printing ❖ [User ID:] Enter the User ID to be displayed in Job History in SmartDeviceMonitor for Client and SmartDeviceMonitor for Admin. 1 ❖ [Print Job] When select to "Store file", the print data is stored in HDD on the machine. Note ❒ you can set the file name and the password to the data. ❖ [User Code:] Use this to set a user code for print logging. Enter a user code using up to eight digits. A user code identifies a group of users and allows you to check the number of sheets printed under each code with SmartDeviceMonitor for Admin. Reference For more information about using SmartDeviceMonitor for Admin, see the Help file. Various Types of Printing This section introduces several printing examples from Windows NT 4.0. Reference As printing can vary depending on the application, see the respective documentation that comes with the application regarding details on settings. Printing on custom sized paper It is possible to make settings for custom sized paper. A Display the data to be printed. B On the [File] menu, click [Print...]. The [Print] dialog box appears. C Select the printer you want to use in the [Name] list box, and then click [Prop- erties]. The [Properties] dialog box appears. D Click the [Advanced] tab. E Click [Paper Size], and from [Change 'Paper Size' Setting], click [PostScript Cus- tom Page Size]. The [PostScript Custom Page Size Definition] dialog box appears. F Select the unit to be used for setting the values in [Unit]. 32
-
 1
1 -
2
-
3
-
4
-
5
-
6
-
7
-
8
-
9
-
10
-
11
-
12
-
13
-
14
-
15
-
16
-
17
-
18
-
19
-
20
-
21
-
22
-
23
-
24
-
25
-
26
-
27
-
28
-
29
-
30
-
 31
31 -
 32
32 -
 33
33 -
 34
34 -
 35
35 -
 36
36 -
 37
37 -
 38
38 -
 39
39 -
 40
40 -
 41
41 -
42
-
43
-
44
-
45
-
46
-
47
-
48
-
49
-
50
-
51
-
52
-
53
-
54
-
55
-
56
-
57
-
58
-
59
-
60
-
61
-
62
-
63
-
64
-
65
 |
 |
