Ridgid MS255SR Operation Manual - Page 30
Inside Corner - Left side - saw parts
 |
View all Ridgid MS255SR manuals
Add to My Manuals
Save this manual to your list of manuals |
Page 30 highlights
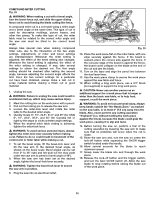
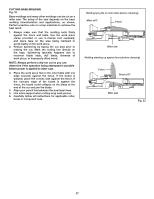
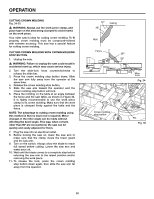
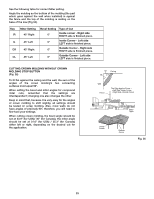
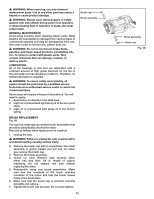
See the following table for correct Miter setting. Angle the molding so the bottom of the molding (the part which goes against the wall when installed) is against the fence and the top of the molding is resting on the base of the saw (Fig 34). Key IR IL OR OL Miter Setting 45° Right 45° Left 45° Right 45° Left Bevel Setting Type of Cut 0° Inside corner - Right side RIGHT side is finished piece. 0° Inside Corner - Left side LEFT side is finished piece. 0° Outside Corner - Right side RIGHT side is finished piece. 0° Outside Corner - Left side LEFT side is finished piece. CUTTING CROWN MOLDING WITHOUT CROWN MOLDING STOP BUTTON (Fig. 36) To fit flat against the ceiling and the wall, the sum of the angles of the crown molding's two connecting surfaces must equal 90°. When setting the bevel and miter angles for compound miter cuts, remember that the settings are interdependent; changing one also changes the other. Keep in mind that, because it is very easy for the angles of crown molding to shift slightly, all settings should be tested on scrap molding. Also, most walls do not have angles of precisely 90°, therefore, you will need to fine-tune your settings. When cutting crown molding, the bevel angle should be set at 33.9° (for USA)/ 30° (for Canada), the miter angle should be set at 31.6° (for USA) / 35.3° (for Canada) either left or right, depending on the desired cut for the application. Fig. 36 29
-
 1
1 -
2
-
3
-
4
-
5
-
6
-
7
-
8
-
9
-
10
-
11
-
12
-
13
-
14
-
15
-
16
-
17
-
18
-
19
-
20
-
21
-
22
-
23
-
24
-
 25
25 -
 26
26 -
 27
27 -
 28
28 -
 29
29 -
 30
30 -
 31
31 -
 32
32 -
 33
33 -
 34
34 -
 35
35 -
36
 |
 |
