Samsung CLP-775 User Manual (user Manual) (ver.1.01) (English) - Page 43
Loading paper in the tray, Tray 1 / optional trays
 |
View all Samsung CLP-775 manuals
Add to My Manuals
Save this manual to your list of manuals |
Page 43 highlights
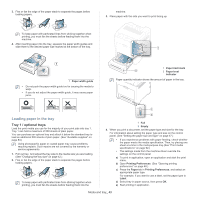
3. Flex or fan the edge of the paper stack to separate the pages before loading papers. machine. 3. Place paper with the side you want to print facing up. To keep paper with perforated lines from sticking together when printing, you must fan the sheets before feeding them into the machine. 4. After inserting paper into the tray, squeeze the paper width guides and slide them to the desired paper size marked at the bottom of the tray. 1 Paper width guide • Do not push the paper width guide too far causing the media to warp. • If you do not adjust the paper width guide, it may cause paper jams. 1 Paper limit mark 2 Paper level indicator Paper quantity indicator shows the amount of paper in the tray. Loading paper in the tray Tray 1 / optional trays Load the print media you use for the majority of your print jobs into tray 1. Tray 1 can hold a maximum of 500 sheets of plain paper. You can purchase an optional tray and attach it below the standard tray to load an additional 500 sheets of plain paper. (See "Available supplies" on page 83.) Using photographic paper or coated paper may cause problems, requiring repairs. Such repairs are not covered by the warranty or service agreements. 1. Pull out tray. And adjust the tray size to the media size you are loading. (See "Changing the tray size" on page 42.) 2. Flex or fan the edge of the paper stack to separate the pages before loading papers. To keep paper with perforated lines from sticking together when printing, you must fan the sheets before feeding them into the 1 Full 2 Empty 4. When you print a document, set the paper type and size for the tray. For information about setting the paper type and size on the control panel. (See "Setting the paper size and type" on page 47.) • If you experience problems with paper feeding, check whether the paper meets the media specification. Then, try placing one sheet at a time in the multi-purpose tray.(See "Print media specifications" on page 92.) • The settings made from the machine driver override the settings on the control panel. a) To print in application, open an application and start the print menu. b) Open Printing Preferences. (See "Opening printing preferences" on page 48.) c) Press the Paper tab in Printing Preferences, and select an appropriate paper type. For example, if you want to use a label, set the paper type to Label. d) Select tray in paper source, then press OK. e) Start printing in application. Media and tray_ 43
-
 1
1 -
2
-
3
-
4
-
5
-
6
-
7
-
8
-
9
-
10
-
11
-
12
-
13
-
14
-
15
-
16
-
17
-
18
-
19
-
20
-
21
-
22
-
23
-
24
-
25
-
26
-
27
-
28
-
29
-
30
-
31
-
32
-
33
-
34
-
35
-
36
-
37
-
 38
38 -
 39
39 -
 40
40 -
 41
41 -
 42
42 -
 43
43 -
 44
44 -
 45
45 -
 46
46 -
 47
47 -
 48
48 -
49
-
50
-
51
-
52
-
53
-
54
-
55
-
56
-
57
-
58
-
59
-
60
-
61
-
62
-
63
-
64
-
65
-
66
-
67
-
68
-
69
-
70
-
71
-
72
-
73
-
74
-
75
-
76
-
77
-
78
-
79
-
80
-
81
-
82
-
83
-
84
-
85
-
86
-
87
-
88
-
89
-
90
-
91
-
92
-
93
-
94
-
95
-
96
-
97
-
98
-
99
-
100
-
101
 |
 |
