Samsung CLP-775 User Manual (user Manual) (ver.1.01) (English) - Page 73
Understanding display messages
 |
View all Samsung CLP-775 manuals
Add to My Manuals
Save this manual to your list of manuals |
Page 73 highlights
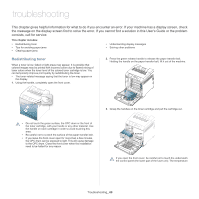
3. Remove the jammed paper by pulling in the direction shown. To avoid tearing the paper, pull it out gently and slowly. 4. Holding the handle on the paper transfer belt, align it with the slots on the inside of the front cover. Understanding display messages Messages appear on the control panel display to indicate the machine's status or errors. Some error messages are shown with graphics to help you troubleshoot problem. Checking display messages 1. When errors occur, Check Status appears on the display and press OK. 2. Check the display message to see what kind of error has occured. If several messages appear, press the up/down arrow to highlight the message you want solve. 3. Press OK on the control panel. Refer to the tables below to understand the messages' and their meaning, and solve the problem, if necessary. • If Check Status still appears, repeat above steps. • If a message is not in the table, reboot the power and try the printing job again. If the problem persists, call for service. • When you call for service, provide the service representative with the contents of display message. • Some messages may not appear in the display depending on options or models. • [aaa] indicates the error code. When you contact the service center, this error code help to handle the problem. • [ccc] indicates the part of the each toner cartridge. • [xxx] indicates the media type. • [yyy] indicates the tray. • [zzz] indicates the paper size. 5. Lower the paper transfer belt until it is parallel with the front cover and firmly seated. 6. Close the front cover to resume printing. If the front cover is not completely closed, the machine will not operate. Troubleshooting_ 73
-
 1
1 -
2
-
3
-
4
-
5
-
6
-
7
-
8
-
9
-
10
-
11
-
12
-
13
-
14
-
15
-
16
-
17
-
18
-
19
-
20
-
21
-
22
-
23
-
24
-
25
-
26
-
27
-
28
-
29
-
30
-
31
-
32
-
33
-
34
-
35
-
36
-
37
-
38
-
39
-
40
-
41
-
42
-
43
-
44
-
45
-
46
-
47
-
48
-
49
-
50
-
51
-
52
-
53
-
54
-
55
-
56
-
57
-
58
-
59
-
60
-
61
-
62
-
63
-
64
-
65
-
66
-
67
-
 68
68 -
 69
69 -
 70
70 -
 71
71 -
 72
72 -
 73
73 -
 74
74 -
 75
75 -
 76
76 -
 77
77 -
 78
78 -
79
-
80
-
81
-
82
-
83
-
84
-
85
-
86
-
87
-
88
-
89
-
90
-
91
-
92
-
93
-
94
-
95
-
96
-
97
-
98
-
99
-
100
-
101
 |
 |
