Samsung DVD-VR300 User Manual (user Manual) (ver.1.0) (English) - Page 17
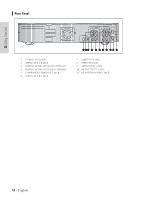
Connections, Method 2 : Connecting to an S-video, input jack, Method 3 : Connecting to, Component
 |
View all Samsung DVD-VR300 manuals
Add to My Manuals
Save this manual to your list of manuals |
Page 17 highlights
Connections Method 2 : Connecting to an S-video input jack Connect an S-video cable(not supplied) between the SVIDEO OUT jack on DVD Recorder-VCR and S-VIDEO IN jack on the TV (or AV amplifier). • You will enjoy high quality images. S-Video separates the picture element into black and white (Y) and color (C) signals to present clearer images than regular video input mode. COMPONENT AUDIO OUT VIDEO OUT R Y L DIGITAL AUDIO OUT OPTICAL COAXIAL CB/PB CR/PR LINE OUT LINE IN 1 R AUDIO R AUDIO L L VIDEO VIDEO IN (FROM ANT.) RF OUT (TO TV) INPUT S-VIDEO Method 3 : Connecting to Component video input jacks(Y,CB/TB,CR/PB) in 480i mode 1. Connect Component video cables(not supplied) between the COMPONENT VIDEO OUT jacks on DVD RecorderVCR and COMPONENT VIDEO IN jacks on the TV (or AV amplifier). 2. Make sure that the disc has stopped completely before changing the mode. If anything is not displayed on front panel display, it is 480i Mode. COMPONENT Y Pb Pr COMPONENT AUDIO OUT VIDEO OUT R Y L DIGITAL AUDIO OUT OPTICAL COAXIAL CB/PB CR/PR LINE OUT LINE IN 1 R AUDIO R AUDIO L L VIDEO VIDEO IN (FROM ANT.) RF OUT (TO TV) COMPONENT VIDEO OUT Y CB/PB CR/PR • You will enjoy high quality accurate color reproduction. Component video separates the picture element into black and white (Y), blue (Pb) and red (Pr) signals to present most clear and clean images. Make sure that the color coded connections match. The Y, Pb and Pr component output jacks of your Note DVD Recorder-VCR must be connected to the exact corresponding component input jacks on your TV. Otherwise, red or blue images will be displayed on the TV screen. Make sure that the left and right audio output jacks of your DVD Recorder-VCR are connected to the left and right audio input jacks of your TV, respectively.(page 18) English - 17
-
 1
1 -
2
-
3
-
4
-
5
-
6
-
7
-
8
-
9
-
10
-
11
-
 12
12 -
 13
13 -
 14
14 -
 15
15 -
 16
16 -
 17
17 -
 18
18 -
 19
19 -
 20
20 -
 21
21 -
 22
22 -
23
-
24
-
25
-
26
-
27
-
28
-
29
-
30
-
31
-
32
-
33
-
34
-
35
-
36
-
37
-
38
-
39
-
40
-
41
-
42
-
43
-
44
-
45
-
46
-
47
-
48
-
49
-
50
-
51
-
52
-
53
-
54
-
55
-
56
-
57
-
58
-
59
-
60
-
61
-
62
-
63
-
64
-
65
-
66
-
67
-
68
-
69
-
70
-
71
-
72
-
73
-
74
-
75
-
76
-
77
-
78
-
79
-
80
-
81
-
82
-
83
-
84
-
85
-
86
-
87
-
88
-
89
-
90
-
91
-
92
-
93
-
94
-
95
-
96
-
97
 |
 |
