Samsung DVD-VR300 User Manual (user Manual) (ver.1.0) (English) - Page 83
C. Moving a Scene, Changing the Position of a Scene, D. Adding a Scene
 |
View all Samsung DVD-VR300 manuals
Add to My Manuals
Save this manual to your list of manuals |
Page 83 highlights
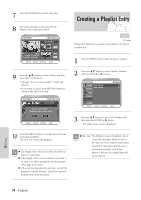
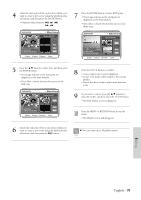
5 Press the ENTER button at the end point of the scene. 3 Press the arrow buttons to select the position where you want to move the selected scene, and then press the ENTER button. • The selected scene is moved to the new position. 6 Press the ❷ buttons to select Change, and then press the ENTER button. • The scene you wanted to modify is changed with the selected section. • If you want to cancel a modification, select cancel and then press the ENTER button. You cannot move the selected scene to the position Note of the next scene, because the selected scene should be inserted before that position. C. Moving a Scene (Changing the Position of a Scene) 1 Press the arrow buttons to select the scene you want to move (change the position), and then press the ENTER button. D. Adding a Scene 1 Press the arrow buttons to select the scene before which you want to add a new scene, and then press the ENTER button. • A yellow selection window is displayed on the scene to add as a new scene. 2 Press the ❷ buttons to select Move, and then press the ENTER button. • A yellow selection window is displayed on the scene to move. 2 Press the ❷ buttons to select Add and then press the ENTER button. • The Add Scene screen is displayed. 3 Select the start point of the section to which you want to add the scene in step 1 using the playback related buttons. • Playback related buttons: ❿II, ❿❿l , l English - 83 Editing
-
 1
1 -
2
-
3
-
4
-
5
-
6
-
7
-
8
-
9
-
10
-
11
-
12
-
13
-
14
-
15
-
16
-
17
-
18
-
19
-
20
-
21
-
22
-
23
-
24
-
25
-
26
-
27
-
28
-
29
-
30
-
31
-
32
-
33
-
34
-
35
-
36
-
37
-
38
-
39
-
40
-
41
-
42
-
43
-
44
-
45
-
46
-
47
-
48
-
49
-
50
-
51
-
52
-
53
-
54
-
55
-
56
-
57
-
58
-
59
-
60
-
61
-
62
-
63
-
64
-
65
-
66
-
67
-
68
-
69
-
70
-
71
-
72
-
73
-
74
-
75
-
76
-
77
-
 78
78 -
 79
79 -
 80
80 -
 81
81 -
 82
82 -
 83
83 -
 84
84 -
 85
85 -
 86
86 -
 87
87 -
 88
88 -
89
-
90
-
91
-
92
-
93
-
94
-
95
-
96
-
97
 |
 |
