Samsung L830 User Manual (ENGLISH) - Page 33
Self-timer, Right button, MENU / OK button
 |
UPC - 044701008613
View all Samsung L830 manuals
Add to My Manuals
Save this manual to your list of manuals |
Page 33 highlights
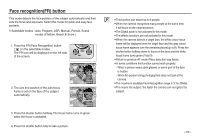
Self-timer ( ) / Right button Selecting the self-timer 1. Select a RECORDING mode with the exception of VOICE RECORDING mode. 2. Press the SELF-TIMER ( ) button until the desired mode indicator displays on the LCD monitor. A 10 second, 2 second, or Double selftimer icon appears on the LCD monitor. [Selecting the 10 SEC self-timer] 2SEC self-timer ( ): Pressing the shutter button will allow an interval of 2 seconds before the image is taken. 10SEC self-timer ( ): Pressing the shutter button will allow an interval of 10 seconds before the image is taken. Double self-timer ( ): A picture will be taken after about 10 seconds and 2 seconds later a second picture will be taken. When using the flash, the 2-second self-timer may be delayed for longer than 2 seconds depending on the flash charging time. 3. When you press the SHUTTER button, the picture will be taken after the specified time has elapsed. If you operate the Self-timer button during the self-timer operation, the self-timer function is cancelled. Use a tripod to prevent the camera from shaking. MENU / OK button MENU button - When you press the MENU button, a menu related to each camera mode will be displayed on the LCD monitor. Pressing it again will return the LCD to the initial display. - A menu option can be displayed when the following are selected : MOVIE CLIP and STILL IMAGE mode. There is no menu available when the VOICE RECORDING mode is selected. [Menu off] [Pressing the MENU button] RECORDING Sharpness Contrast Focus Area Voice Memo Voice Recording MENU Exit Normal Normal Center AF Off Move [Menu on] OK button - When the menu is displayed on the LCD monitor, this button is used for shifting the cursor to the sub menu or for confirming data. >
-
 1
1 -
2
-
3
-
4
-
5
-
6
-
7
-
8
-
9
-
10
-
11
-
12
-
13
-
14
-
15
-
16
-
17
-
18
-
19
-
20
-
21
-
22
-
23
-
24
-
25
-
26
-
27
-
 28
28 -
 29
29 -
 30
30 -
 31
31 -
 32
32 -
 33
33 -
 34
34 -
 35
35 -
 36
36 -
 37
37 -
 38
38 -
39
-
40
-
41
-
42
-
43
-
44
-
45
-
46
-
47
-
48
-
49
-
50
-
51
-
52
-
53
-
54
-
55
-
56
-
57
-
58
-
59
-
60
-
61
-
62
-
63
-
64
-
65
-
66
-
67
-
68
-
69
-
70
-
71
-
72
-
73
-
74
-
75
-
76
-
77
-
78
-
79
-
80
-
81
-
82
-
83
-
84
-
85
-
86
-
87
-
88
-
89
-
90
-
91
-
92
-
93
-
94
-
95
-
96
-
97
-
98
-
99
-
100
-
101
-
102
-
103
-
104
-
105
-
106
-
107
-
108
-
109
-
110
-
111
 |
 |
