Samsung L830 User Manual (ENGLISH) - Page 56
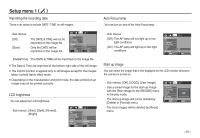
Imprinting the recording date, Auto Focus lamp, Start up image, LCD brightness
 |
UPC - 044701008613
View all Samsung L830 manuals
Add to My Manuals
Save this manual to your list of manuals |
Page 56 highlights
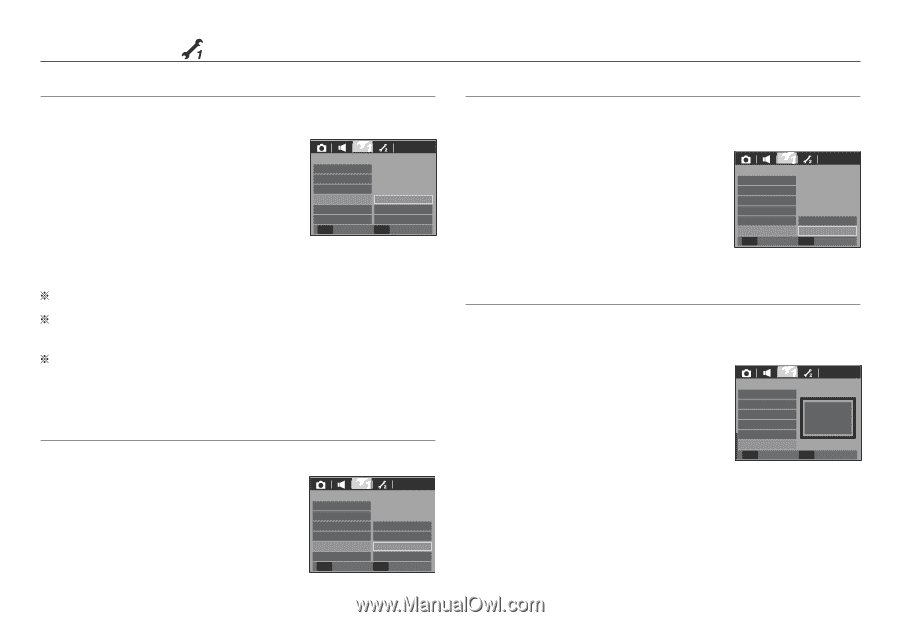
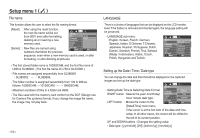
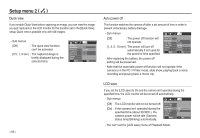
Setup menu 1 ( ) Imprinting the recording date There is an option to include DATE / TIME on still images. Auto Focus lamp You can turn on and off the Auto Focus lamp. - Sub menus [Off] [Date] : The DATE & TIME will not be imprinted on the image file. : Only the DATE will be imprinted on the image file. SETUP 1 File Language Date & Time Imprint LCD AF Lamp Back Off Date Date&Time OK Set [Date&Time] : The DATE & TIME will be imprinted on the image file. The Date & Time are imprinted at the bottom right side of the still image. The imprint function is applied only to still images except for the images taken in photo frame effect mode. Depending on the manufacturer and print mode, the date printed on an image may not be printed correctly. LCD brightness You can adjust the LCD brightness. - Sub menus : [Auto], [Dark], [Normal], [Bright] SETUP 1 File Language Date & Time Imprint LCD AF Lamp Back Auto Dark Normal Bright OK Set - Sub menus [Off] : The AF lamp will not light up in low light conditions. [On] : The AF lamp will light up in low light conditions. SETUP 1 File Language Date & Time Imprint LCD AF Lamp Back Off On OK Set Start up image You can select the image that is first displayed on the LCD monitor whenever the camera is turned on. - Sub menus : [Off], [LOGO], [User Image] - Use a saved image for the start-up image with the [Start Image] in the [RESIZE] menu in the play mode. - The start-up image will not be deleted by [Delete] or [Format] menu. - The User images will be deleted by [Reset] menu. SETUP 1 Language Date & Time Imprint LCD AF Lamp Start Image Back Off OK Back >
-
 1
1 -
2
-
3
-
4
-
5
-
6
-
7
-
8
-
9
-
10
-
11
-
12
-
13
-
14
-
15
-
16
-
17
-
18
-
19
-
20
-
21
-
22
-
23
-
24
-
25
-
26
-
27
-
28
-
29
-
30
-
31
-
32
-
33
-
34
-
35
-
36
-
37
-
38
-
39
-
40
-
41
-
42
-
43
-
44
-
45
-
46
-
47
-
48
-
49
-
50
-
 51
51 -
 52
52 -
 53
53 -
 54
54 -
 55
55 -
 56
56 -
 57
57 -
 58
58 -
 59
59 -
 60
60 -
 61
61 -
62
-
63
-
64
-
65
-
66
-
67
-
68
-
69
-
70
-
71
-
72
-
73
-
74
-
75
-
76
-
77
-
78
-
79
-
80
-
81
-
82
-
83
-
84
-
85
-
86
-
87
-
88
-
89
-
90
-
91
-
92
-
93
-
94
-
95
-
96
-
97
-
98
-
99
-
100
-
101
-
102
-
103
-
104
-
105
-
106
-
107
-
108
-
109
-
110
-
111
 |
 |