Samsung L830 User Manual (ENGLISH) - Page 49
Sharpness, Contrast, Focus Area
 |
UPC - 044701008613
View all Samsung L830 manuals
Add to My Manuals
Save this manual to your list of manuals |
Page 49 highlights
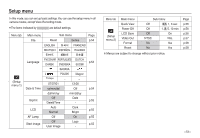
Sharpness You can adjust the sharpness of the picture you are about to take. You cannot check the sharpness effect on the LCD monitor before you take a picture, because this function is applied only when the captured image is stored on the memory. RECORDING Sharpness Contrast Focus Area Voice Memo Voice Record Back Soft+ Soft Normal Vivid Vivid+ OK Set [Soft+]/ [Soft] : The edges of the image are softened. This effect is suitable for editing images on your PC. [Normal] : The edges of the image are sharp. This is suitable for printing. [Vivid]/ [Vivid+] : The edges of the image are emphasized. The edges will appear sharp, but noise may occur in the recorded image. Contrast You can set the difference between bright part of the image and dark part of the image. [High] : The image contrast is high. [Normal] : The contrast is normal. [Low] : The image contrast is more subtle. RECORDING Sharpness Contrast Focus Area Voice Memo Voice Record Back High Normal Low OK Set Focus Area You can select your preferred Focus Area according to the shooting conditions. [Center AF] : The rectangular area in the center of the LCD monitor will be focused [Multi AF] : This camera selects all of available AF point from the 9 AF points. RECORDING Sharpness Contrast Focus Area Voice Memo Voice Record Back Center AF Multi AF OK Set [Center AF] [Multi AF] When the camera focuses on the subject, the auto focus frame turns to green. When the camera doesn't focus on the subject, the auto focus frame turns to red. >
-
 1
1 -
2
-
3
-
4
-
5
-
6
-
7
-
8
-
9
-
10
-
11
-
12
-
13
-
14
-
15
-
16
-
17
-
18
-
19
-
20
-
21
-
22
-
23
-
24
-
25
-
26
-
27
-
28
-
29
-
30
-
31
-
32
-
33
-
34
-
35
-
36
-
37
-
38
-
39
-
40
-
41
-
42
-
43
-
 44
44 -
 45
45 -
 46
46 -
 47
47 -
 48
48 -
 49
49 -
 50
50 -
 51
51 -
 52
52 -
 53
53 -
 54
54 -
55
-
56
-
57
-
58
-
59
-
60
-
61
-
62
-
63
-
64
-
65
-
66
-
67
-
68
-
69
-
70
-
71
-
72
-
73
-
74
-
75
-
76
-
77
-
78
-
79
-
80
-
81
-
82
-
83
-
84
-
85
-
86
-
87
-
88
-
89
-
90
-
91
-
92
-
93
-
94
-
95
-
96
-
97
-
98
-
99
-
100
-
101
-
102
-
103
-
104
-
105
-
106
-
107
-
108
-
109
-
110
-
111
 |
 |
