Samsung L830 User Manual (ENGLISH) - Page 57
Setup menu 2
 |
UPC - 044701008613
View all Samsung L830 manuals
Add to My Manuals
Save this manual to your list of manuals |
Page 57 highlights
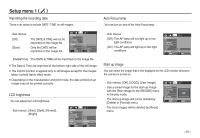
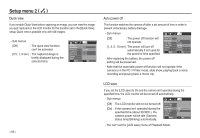
Setup menu 2 ( ) Quick view If you enable Quick View before capturing an image, you can view the image you just captured on the LCD monitor for the duration set in the [Quick View] setup. Quick view is possible only with still images. - Sub menus [Off] : The quick view function can't be activated. [0.5, 1, 3 sec] : The captured image is briefly displayed during the selected time. SETUP 2 Quick View Power Off LCD Save Video Out Format Reset Back 2 Off 0.5 sec 1 sec 3 sec OK Set > Auto power off This function switches the camera off after a set amount of time in order to prevent unnecessary battery drainage. - Sub menus [Off] : The power off function will not operate. [1, 3, 5, 10 min] : The power will turn off automatically if not used for the period of time specified. SETUP 2 Quick View Power Off LCD Save Video Out Format Reset Back 2 Off 1 min 3 min 5 min 10 min OK Set - After replacing the battery, the power off setting will be preserved. - Note that the automatic power off function will not operate if the camera is in the PC / Printer mode, slide show, playing back a voice recording and playing back a movie clip. LCD save If you set the [LCD save] to On and the camera isn't operated during the specified time, the LCD monitor will be turned off automatically. - Sub menus [Off] : The LCD monitor will not be turned off. [On] : If the camera isn't operated during the specified time (about 30 SEC.), the camera power will be idle (Camera status lamp:Blinking) automatically. SETUP 2 Quick View Power Off LCD Save Video Out Format Reset Back 2 Off On OK Set - You can't set the [LCD save] menu of Playback Mode.
-
 1
1 -
2
-
3
-
4
-
5
-
6
-
7
-
8
-
9
-
10
-
11
-
12
-
13
-
14
-
15
-
16
-
17
-
18
-
19
-
20
-
21
-
22
-
23
-
24
-
25
-
26
-
27
-
28
-
29
-
30
-
31
-
32
-
33
-
34
-
35
-
36
-
37
-
38
-
39
-
40
-
41
-
42
-
43
-
44
-
45
-
46
-
47
-
48
-
49
-
50
-
51
-
 52
52 -
 53
53 -
 54
54 -
 55
55 -
 56
56 -
 57
57 -
 58
58 -
 59
59 -
 60
60 -
 61
61 -
 62
62 -
63
-
64
-
65
-
66
-
67
-
68
-
69
-
70
-
71
-
72
-
73
-
74
-
75
-
76
-
77
-
78
-
79
-
80
-
81
-
82
-
83
-
84
-
85
-
86
-
87
-
88
-
89
-
90
-
91
-
92
-
93
-
94
-
95
-
96
-
97
-
98
-
99
-
100
-
101
-
102
-
103
-
104
-
105
-
106
-
107
-
108
-
109
-
110
-
111
 |
 |
