Samsung NX58R4311SS/AA User Manual - Page 52
Changing the oven light, Oven light, WARNING
 |
View all Samsung NX58R4311SS/AA manuals
Add to My Manuals
Save this manual to your list of manuals |
Page 52 highlights
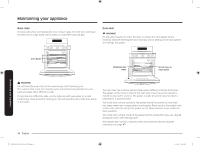
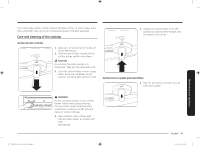
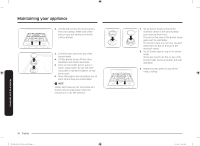
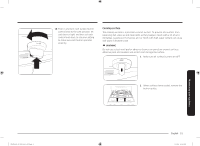
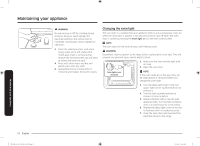
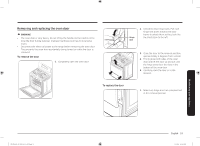
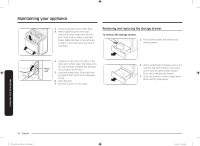
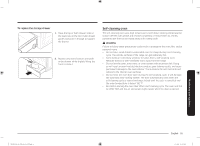
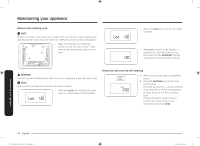
Maintaining your appliance WARNING Do not remove or lift the cooktop during cleaning. Doing so could damage the gas lines leading to the surface burner manifolds, causing poor and/or dangerous operation. 3. Clean the cooktop surface with warm, soapy water and a soft, damp cloth. If spill goes under a surface burner, remove the surface burner cap and head to access and clean the spill. 4. Rinse with clean water and dry and polish with a soft, dry cloth. 5. Reassemble burner components (if removed) and replace the burner grates. Changing the oven light The oven light is a standard 40-watt appliance bulb. It will automatically come on when the oven door is opened. It can also be turned on and off when the oven door is closed by pressing the Oven light pad on the oven control panel. NOTE The oven light will not work during a self-cleaning cycle. WARNING Disconnect electrical power to the range before replacing the oven light. This will prevent any personal injury due to electric shock. 1. Make sure the oven and the light bulb are cool. 2. Open the oven door. Oven light cover and bulb NOTE If the oven racks are in the way, they can be repositioned or removed before you change the oven light. 3. Turn the glass light cover in the rear upper-right corner counterclockwise to remove it. 4. Turn the bulb counterclockwise to remove it from its socket. 5. Replace the bulb with a new 40-watt appliance bulb. Turn the bulb clockwise until it is seated securely in the socket. 6. Replace the glass light cover by turning it clockwise until it is seated securely. 7. Close the oven door and reconnect the electrical power to the range. Maintaining your appliance 52 English NX58R4311SS_AA_DG68-01151A-00_EN.indd 52 1/25/2019 11:18:38 AM
-
 1
1 -
2
-
3
-
4
-
5
-
6
-
7
-
8
-
9
-
10
-
11
-
12
-
13
-
14
-
15
-
16
-
17
-
18
-
19
-
20
-
21
-
22
-
23
-
24
-
25
-
26
-
27
-
28
-
29
-
30
-
31
-
32
-
33
-
34
-
35
-
36
-
37
-
38
-
39
-
40
-
41
-
42
-
43
-
44
-
45
-
46
-
 47
47 -
 48
48 -
 49
49 -
 50
50 -
 51
51 -
 52
52 -
 53
53 -
 54
54 -
 55
55 -
 56
56 -
 57
57 -
58
-
59
-
60
-
61
-
62
-
63
-
64
-
65
-
66
-
67
-
68
-
69
-
70
-
71
-
72
-
73
-
74
-
75
-
76
-
77
-
78
-
79
-
80
-
81
-
82
-
83
-
84
-
85
-
86
-
87
-
88
-
89
-
90
-
91
-
92
-
93
-
94
-
95
-
96
-
97
-
98
-
99
-
100
-
101
-
102
-
103
-
104
-
105
-
106
-
107
-
108
-
109
-
110
-
111
-
112
-
113
-
114
-
115
-
116
-
117
-
118
-
119
-
120
-
121
-
122
-
123
-
124
-
125
-
126
-
127
-
128
-
129
-
130
-
131
-
132
-
133
-
134
-
135
-
136
-
137
-
138
-
139
-
140
-
141
-
142
-
143
-
144
-
145
-
146
-
147
-
148
-
149
-
150
-
151
-
152
-
153
-
154
-
155
-
156
-
157
-
158
-
159
-
160
-
161
-
162
-
163
-
164
-
165
-
166
-
167
-
168
-
169
-
170
-
171
-
172
-
173
-
174
-
175
-
176
-
177
-
178
-
179
-
180
-
181
-
182
-
183
-
184
-
185
-
186
-
187
-
188
-
189
-
190
-
191
-
192
-
193
-
194
-
195
-
196
-
197
-
198
-
199
-
200
-
201
-
202
-
203
-
204
-
205
-
206
-
207
-
208
-
209
-
210
-
211
-
212
-
213
-
214
-
215
-
216
 |
 |
