Samsung SM-G530A User Manual - Page 43
Take Pictures, Shooting Mode, Camera Settings, HDR Rich tone
 |
View all Samsung SM-G530A manuals
Add to My Manuals
Save this manual to your list of manuals |
Page 43 highlights
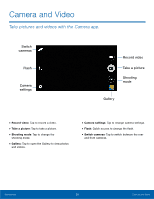
Take Pictures Take pictures with your device's front or back camera, or combine shots with Dual mode. 1. From a Home screen, tap Apps > Camera. 2. Using the display screen as a viewfinder, compose your shot by aiming the camera at the subject. While composing your picture, use the options or these gestures: • Touch the screen with two fingers and pinch or spread them on the screen to zoom in and out. • Tap the screen to focus on the area you touched. 3. Tap to take the picture. Note: You can also press the Volume key up or down to take a photo. The Volume key can be reassigned to act as the video record key or as a zoom key. Shooting Mode Several photo effects are available. Some modes are not available when taking self-portraits. 1. From a Home screen, tap Apps > Camera. 2. Tap MODE to display the following options: • Auto: Allow the camera to evaluate the surroundings and determine the ideal mode for the picture. • Beauty face: Take a photo with lightened faces for gentler images. • Panorama: Take a photo composed of many photos strung together. • Rear-cam selfie: Detect and focus on your face when you take self-portrait pictures. • Continuous shot: Take pictures continuously by pressing and holding the Camera button. • HDR (Rich tone): Take multiple shots in various exposures and combine them to create soft and rich colors. • Night: Take brighter, clearer pictures in low light without the flash. • Animated GIF: Create animated images by taking pictures continuously. • Selfie: Take selfies easily by making simple gesture commands. (Front camera only.) • Wide selfie: Take wide-angle selfie shots to fit more people into your pictures. (Front camera only.) Camera Settings 1. From a Home screen, tap Apps > Camera. 2. Tap Settings. Available options vary depending on the camera/recording mode used. • Flash: Activate or deactivate the flash. • Save as flipped: Save all pictures as flipped images, as shown in the preview. (Only available on the front camera.) • Timer: Take time-delayed pictures or videos. • Effects: Add special graphical effects. • Picture size: Select a resolution. Use higher resolution for higher quality. Higher resolution pictures take up more memory. 3. Tap to display the following additional options: • Exposure value: Change the exposure value. This determines how much light the camera's sensor receives. For low light situations, use a higher exposure. • ISO: Select an ISO value. This controls camera light sensitivity. It is measured in film-camera equivalents. Low values are for stationary or brightly-lit objects. Higher values are for fast-moving or poorly-lit objects. • White balance: Select an appropriate white balance, so images have a true-to-life color range. The settings are designed for specific lighting situations. These settings are similar to the heat range for white-balance exposure in professional cameras. Applications 37 Camera and Video
-
 1
1 -
2
-
3
-
4
-
5
-
6
-
7
-
8
-
9
-
10
-
11
-
12
-
13
-
14
-
15
-
16
-
17
-
18
-
19
-
20
-
21
-
22
-
23
-
24
-
25
-
26
-
27
-
28
-
29
-
30
-
31
-
32
-
33
-
34
-
35
-
36
-
37
-
 38
38 -
 39
39 -
 40
40 -
 41
41 -
 42
42 -
 43
43 -
 44
44 -
 45
45 -
 46
46 -
 47
47 -
 48
48 -
49
-
50
-
51
-
52
-
53
-
54
-
55
-
56
-
57
-
58
-
59
-
60
-
61
-
62
-
63
-
64
-
65
-
66
-
67
-
68
-
69
-
70
-
71
-
72
-
73
-
74
-
75
-
76
-
77
-
78
-
79
-
80
-
81
-
82
-
83
-
84
-
85
-
86
-
87
-
88
-
89
-
90
-
91
-
92
-
93
-
94
-
95
-
96
-
97
-
98
-
99
-
100
-
101
-
102
 |
 |
