Samsung Xpress SL-M2021 User Manual Ver.1.0 (English) - Page 107
Setup using Mac
 |
View all Samsung Xpress SL-M2021 manuals
Add to My Manuals
Save this manual to your list of manuals |
Page 107 highlights
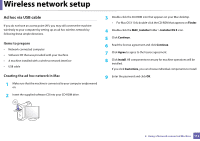
Wireless network setup 9 The Wireless Network Setting Complete window appears. Click Next. 10 When the wireless network settings are completed, disconnect the USB cable between the computer and machine. Click Next. 11 Follow the instructions in the installation window. 9 Setup using Mac Access point via USB cable Items to prepare • Access point • Network-connected printer • Software CD that was provided with your machine • A machine installed with a wireless network interface • USB cable 1 Make sure that the machine is connected to your computer andpowered on. 2 Insert the supplied software CD into your CD-ROM drive. 3 Double-click the CD-ROM icon that appears on your Mac desktop. • For Mac OS X 10.8, double-click the CD-ROM that appears on Finder. 4 Double-click the MAC_Installer folder > Installer OS X icon. 5 Click Continue. 6 Read the license agreement and click Continue. 7 Click Agree to agree to the license agreement. 8 Click Install. All components necessary for machine operations will be installed. If you click Customize, you can choose individual components to install. 9 Enter the password and click OK. 2. Using a Network-connected Machine 107
-
 1
1 -
2
-
3
-
4
-
5
-
6
-
7
-
8
-
9
-
10
-
11
-
12
-
13
-
14
-
15
-
16
-
17
-
18
-
19
-
20
-
21
-
22
-
23
-
24
-
25
-
26
-
27
-
28
-
29
-
30
-
31
-
32
-
33
-
34
-
35
-
36
-
37
-
38
-
39
-
40
-
41
-
42
-
43
-
44
-
45
-
46
-
47
-
48
-
49
-
50
-
51
-
52
-
53
-
54
-
55
-
56
-
57
-
58
-
59
-
60
-
61
-
62
-
63
-
64
-
65
-
66
-
67
-
68
-
69
-
70
-
71
-
72
-
73
-
74
-
75
-
76
-
77
-
78
-
79
-
80
-
81
-
82
-
83
-
84
-
85
-
86
-
87
-
88
-
89
-
90
-
91
-
92
-
93
-
94
-
95
-
96
-
97
-
98
-
99
-
100
-
101
-
 102
102 -
 103
103 -
 104
104 -
 105
105 -
 106
106 -
 107
107 -
 108
108 -
 109
109 -
 110
110 -
 111
111 -
 112
112 -
113
-
114
-
115
-
116
-
117
-
118
-
119
-
120
-
121
-
122
-
123
-
124
-
125
-
126
-
127
-
128
-
129
-
130
-
131
-
132
-
133
-
134
-
135
-
136
-
137
-
138
-
139
-
140
-
141
-
142
-
143
-
144
-
145
-
146
-
147
-
148
-
149
-
150
-
151
-
152
-
153
-
154
-
155
-
156
-
157
-
158
-
159
-
160
-
161
-
162
-
163
-
164
-
165
-
166
-
167
-
168
-
169
-
170
-
171
-
172
-
173
-
174
-
175
-
176
-
177
-
178
-
179
-
180
-
181
-
182
-
183
-
184
-
185
-
186
-
187
-
188
-
189
-
190
-
191
-
192
-
193
-
194
-
195
-
196
-
197
-
198
-
199
 |
 |
