Sanyo PDG-DET100L Instruction Manual, PDG-DET100L POA-MD13NET2 - Page 12
Flow of installation, Set up is completed. - review
 |
UPC - 086483074684
View all Sanyo PDG-DET100L manuals
Add to My Manuals
Save this manual to your list of manuals |
Page 12 highlights
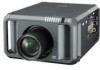
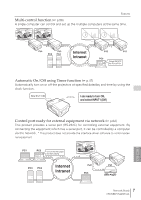
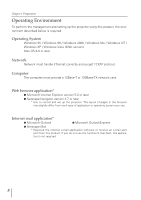
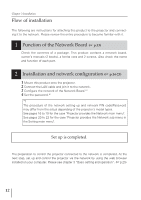
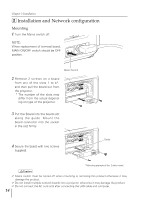
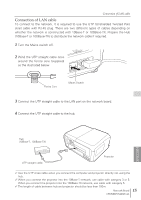
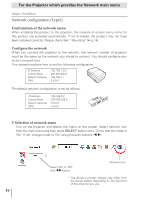
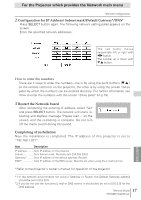
Chapter 2 Installation Flow of installation The following are instructions for attaching this product to the projector and connecting it to the network. Please review the entire procedure to become familiar with it. 1 Function of the Network Board (☞ p.13) Check the contents of a package. This product contains a network board, owner's manuals (2 books), a ferrite core and 2 screws. Also check the name and function of each part. 2 Installation and network configuration (☞ p.14-23) 1 Mount this product onto the projector. 2 Connect the LAN cable and join it to the network. 3 Configure the network of the Network Board.*1 4 Set the password.*1 *1 The procedure of the network setting up and network PIN code/Password may differ from the actual depending of the projector's model types. See pages 16 to 19 for the case "Projector provides the Network main menu". See pages 20 to 22 for the case "Projector provides the Network sub menu in the Setting main menu". Set up is completed. The preparation to control the projector connected to the network is completed. At the next step, set up and control the projector via the network by using the web browser installed on your computer. Please see chapter 3 "Basic setting and operation". (☞ p.25) 12
-
 1
1 -
2
-
3
-
4
-
5
-
6
-
 7
7 -
 8
8 -
 9
9 -
 10
10 -
 11
11 -
 12
12 -
 13
13 -
 14
14 -
 15
15 -
 16
16 -
 17
17 -
18
-
19
-
20
-
21
-
22
-
23
-
24
-
25
-
26
-
27
-
28
-
29
-
30
-
31
-
32
-
33
-
34
-
35
-
36
-
37
-
38
-
39
-
40
-
41
-
42
-
43
-
44
-
45
-
46
-
47
-
48
-
49
-
50
-
51
-
52
-
53
-
54
-
55
-
56
-
57
-
58
-
59
-
60
-
61
-
62
-
63
-
64
-
65
-
66
-
67
-
68
-
69
-
70
-
71
-
72
-
73
-
74
-
75
-
76
-
77
-
78
-
79
-
80
-
81
-
82
-
83
-
84
-
85
-
86
-
87
-
88
-
89
-
90
-
91
-
92
 |
 |