Sanyo PDG-DET100L Instruction Manual, PDG-DET100L POA-MD13NET2 - Page 26
Login the setting of the projector, 1 Enter the IP address, 2 Select a display mode and login
 |
UPC - 086483074684
View all Sanyo PDG-DET100L manuals
Add to My Manuals
Save this manual to your list of manuals |
Page 26 highlights
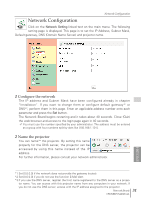
Chapter 3 Basic Setting and Operation This chapter describes basic operations and settings for controlling the projector via a network using this product. It is required that computer and projector are connected to the network and the network address be properly configured. Login the setting page of the projector 1 Enter the IP address Launch the web browser installed in your computer, enter the IP address into the "Address" on the browser and then press the "Enter" key. Enter the IP address that you configured in chapter "Network Configuration" (☞ p.16-22). The default IP address is [192.168.0.2]. 2 Select a display mode and login This product provides 2 types of control mode, Graphic Mode and Text Mode as the below. Select a proper mode to match your computer and network environment by clicking on the text link. Once you select your desired display mode, the setting page you selected display mode will be displayed automatically from the next login. To change the display mode, click "Top" on the lower-left corner of the setting page (☞p.27). Graphic Mode Text Mode Displays with 600 x 400 dots and the menus and settings with graphic icons. This mode is recommended for standard use. Displays with 200 x 300 dots. This mode is optimized for use of the handheld computer, PDA, etc. It is also convenient if the network traffic is heavy. If the setting page has set the password, the authentication window will appear. In this case type "user" onto the User Name text area and the login password onto the Password text area and then press the OK button. * The entering User Name must be "user" and it cannot be changed. [Note] When accessing projector for the first time or setting the no password [0000], the auto-login will be performed and the next main setting page is displayed. 26
-
 1
1 -
2
-
3
-
4
-
5
-
6
-
7
-
8
-
9
-
10
-
11
-
12
-
13
-
14
-
15
-
16
-
17
-
18
-
19
-
20
-
 21
21 -
 22
22 -
 23
23 -
 24
24 -
 25
25 -
 26
26 -
 27
27 -
 28
28 -
 29
29 -
 30
30 -
 31
31 -
32
-
33
-
34
-
35
-
36
-
37
-
38
-
39
-
40
-
41
-
42
-
43
-
44
-
45
-
46
-
47
-
48
-
49
-
50
-
51
-
52
-
53
-
54
-
55
-
56
-
57
-
58
-
59
-
60
-
61
-
62
-
63
-
64
-
65
-
66
-
67
-
68
-
69
-
70
-
71
-
72
-
73
-
74
-
75
-
76
-
77
-
78
-
79
-
80
-
81
-
82
-
83
-
84
-
85
-
86
-
87
-
88
-
89
-
90
-
91
-
92
 |
 |
