Sanyo PDG-DET100L Instruction Manual, PDG-DET100L POA-MD13NET2 - Page 21
For the Projector which provides the Network sub menu in the Setting main menu
 |
UPC - 086483074684
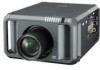
View all Sanyo PDG-DET100L manuals
Add to My Manuals
Save this manual to your list of manuals |
Page 21 highlights
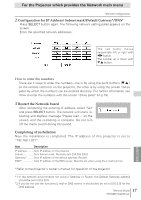
For the Projector which provides the Network sub menu in the Setting main menu Network configuration 2 Configuration for IP Address/ Subnet mask/Default Gateway*/DNS* Press the SELECT button again, the following network setting menu appears on the screen. Enter the specified network address with the point buttons (d e 7 8). The following is an example of a network configuration. NETWORK SETTING IP Address 192 168 Sub net 255 255 Gateway 192 168 DNS 0 0 1 201 255 0 1 1 0 0 SET CANCEL How to enter the numbers To move the selection and change the values, use the point buttons (d e 7 8) on the projector or on the remote control. The point buttons 7 8 are used to select the column. The point buttons d e are used to change the numbers up and down. 3 Restart the Network board Select the SET with the point buttons ( 7 8) and press the SELECT button again. The network configuration display disappears and the network board begins restarting*1. It takes about 40 seconds. Do not turn off the mains switch during this period. Completing of installation Now the installation is completed. The IP address of this projector is set to "192.168.1.201". ENGLISH * In the network environments not using a Gateway or Router, the Default Gateway address should be set to [0.0.0.0]. If you do not use the functions E-mail or DNS server, it should also be set to [0.0.0.0] for the DNS address. 21 Network Board OWNER'S MANUAL
-
 1
1 -
2
-
3
-
4
-
5
-
6
-
7
-
8
-
9
-
10
-
11
-
12
-
13
-
14
-
15
-
 16
16 -
 17
17 -
 18
18 -
 19
19 -
 20
20 -
 21
21 -
 22
22 -
 23
23 -
 24
24 -
 25
25 -
 26
26 -
27
-
28
-
29
-
30
-
31
-
32
-
33
-
34
-
35
-
36
-
37
-
38
-
39
-
40
-
41
-
42
-
43
-
44
-
45
-
46
-
47
-
48
-
49
-
50
-
51
-
52
-
53
-
54
-
55
-
56
-
57
-
58
-
59
-
60
-
61
-
62
-
63
-
64
-
65
-
66
-
67
-
68
-
69
-
70
-
71
-
72
-
73
-
74
-
75
-
76
-
77
-
78
-
79
-
80
-
81
-
82
-
83
-
84
-
85
-
86
-
87
-
88
-
89
-
90
-
91
-
92
 |
 |
