Sanyo PDG-DET100L Instruction Manual, PDG-DET100L POA-MD13NET2 - Page 14
Installation and Network configuration, Mounting
 |
UPC - 086483074684
View all Sanyo PDG-DET100L manuals
Add to My Manuals
Save this manual to your list of manuals |
Page 14 highlights
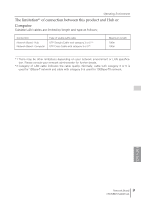
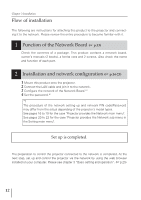
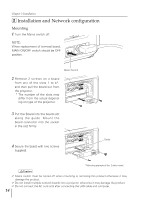
Chapter 2 Installation x Installation and Network configuration Mounting 1 Turn the Mains switch off. NOTE; When replacement of terminal board, MAIN ON/OFF switch should be OFF position. Mains Switch 2 Remove 2 screws on a board from any of the slots 1 to 4*, and then pull the board out from the projector. * The number of the slots may differ from the actual depending on type of the projector. 3 Put the Board into the board slot along the guide. Mount the board connector into the socket in the slot firmly. 4 Secure the board with two screws (supplied). Guide * Mounting example of the 2 slots model. ! Caution ✐ Mains switch must be turned off when mounting or removing this product otherwise it may damage the product. ✐ Do not install multiple network boards into a projector otherwise it may damage the product. ✐ Do not connect the AC cord until after connecting the LAN cable and computer. 14
-
 1
1 -
2
-
3
-
4
-
5
-
6
-
7
-
8
-
 9
9 -
 10
10 -
 11
11 -
 12
12 -
 13
13 -
 14
14 -
 15
15 -
 16
16 -
 17
17 -
 18
18 -
 19
19 -
20
-
21
-
22
-
23
-
24
-
25
-
26
-
27
-
28
-
29
-
30
-
31
-
32
-
33
-
34
-
35
-
36
-
37
-
38
-
39
-
40
-
41
-
42
-
43
-
44
-
45
-
46
-
47
-
48
-
49
-
50
-
51
-
52
-
53
-
54
-
55
-
56
-
57
-
58
-
59
-
60
-
61
-
62
-
63
-
64
-
65
-
66
-
67
-
68
-
69
-
70
-
71
-
72
-
73
-
74
-
75
-
76
-
77
-
78
-
79
-
80
-
81
-
82
-
83
-
84
-
85
-
86
-
87
-
88
-
89
-
90
-
91
-
92
 |
 |
