Sharp AR-M237 AR-M237 AR-M277 Operation Manual Suite - Page 109
Connecting To A Computer - driver xp
 |
View all Sharp AR-M237 manuals
Add to My Manuals
Save this manual to your list of manuals |
Page 109 highlights
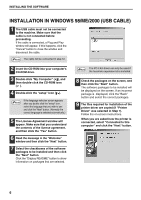
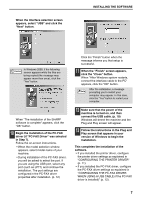
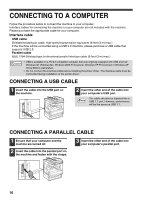
CONNECTING TO A COMPUTER Follow the procedure below to connect the machine to your computer. Interface cables for connecting the machine to your computer are not included with the machine. Please purchase the appropriate cable for your computer. Interface cable USB cable Shielded twisted pair cable, high-speed transmission equivalent (9 feet (3 m) max.) If the machine will be connected using a USB 2.0 interface, please purchase a USB cable that supports USB 2.0. Parallel cable IEEE 1284-Shielded type bi-directional parallel interface cable (9 feet (3 m) max.) Caution • USB is available on a PC/AT compatible computer that was originally equipped with USB and had Windows 98, Windows Me, Windows 2000 Professional, Windows XP Professional or Windows XP Home Edition preinstalled. • Do not connect the interface cable before installing the printer driver. The interface cable must be connected during installation of the printer driver. CONNECTING A USB CABLE 1 Insert the cable into the USB port on the machine. 2 Insert the other end of the cable into your computer's USB port. The cable can also be inserted into a Note USB 1.1 port. However, performance will be the same as USB 1.1. CONNECTING A PARALLEL CABLE 1 Ensure that your computer and the machine are turned off. 2 Insert the cable into the parallel port on the machine and fasten with the clasps. 3 Insert the other end of the cable into your computer's parallel port. 10
-
 1
1 -
2
-
3
-
4
-
5
-
6
-
7
-
8
-
9
-
10
-
11
-
12
-
13
-
14
-
15
-
16
-
17
-
18
-
19
-
20
-
21
-
22
-
23
-
24
-
25
-
26
-
27
-
28
-
29
-
30
-
31
-
32
-
33
-
34
-
35
-
36
-
37
-
38
-
39
-
40
-
41
-
42
-
43
-
44
-
45
-
46
-
47
-
48
-
49
-
50
-
51
-
52
-
53
-
54
-
55
-
56
-
57
-
58
-
59
-
60
-
61
-
62
-
63
-
64
-
65
-
66
-
67
-
68
-
69
-
70
-
71
-
72
-
73
-
74
-
75
-
76
-
77
-
78
-
79
-
80
-
81
-
82
-
83
-
84
-
85
-
86
-
87
-
88
-
89
-
90
-
91
-
92
-
93
-
94
-
95
-
96
-
97
-
98
-
99
-
100
-
101
-
102
-
103
-
 104
104 -
 105
105 -
 106
106 -
 107
107 -
 108
108 -
 109
109 -
 110
110 -
 111
111 -
 112
112 -
 113
113 -
 114
114 -
115
-
116
-
117
-
118
-
119
-
120
-
121
-
122
-
123
-
124
-
125
-
126
-
127
-
128
-
129
-
130
-
131
-
132
-
133
-
134
-
135
-
136
-
137
-
138
-
139
-
140
-
141
-
142
-
143
-
144
-
145
-
146
-
147
-
148
-
149
-
150
-
151
-
152
-
153
-
154
-
155
-
156
-
157
-
158
-
159
-
160
-
161
-
162
-
163
-
164
-
165
-
166
-
167
-
168
-
169
-
170
-
171
-
172
-
173
-
174
-
175
-
176
-
177
-
178
-
179
-
180
-
181
-
182
-
183
-
184
-
185
-
186
-
187
-
188
-
189
-
190
-
191
-
192
-
193
-
194
-
195
-
196
-
197
-
198
-
199
-
200
-
201
-
202
-
203
-
204
-
205
-
206
-
207
-
208
-
209
-
210
-
211
-
212
-
213
-
214
-
215
-
216
-
217
-
218
-
219
-
220
-
221
-
222
-
223
-
224
-
225
-
226
-
227
-
228
-
229
-
230
-
231
-
232
-
233
-
234
-
235
-
236
-
237
-
238
-
239
-
240
-
241
-
242
-
243
-
244
-
245
-
246
-
247
-
248
-
249
-
250
-
251
-
252
-
253
-
254
-
255
-
256
-
257
-
258
-
259
-
260
-
261
-
262
-
263
 |
 |
