Sharp AR-M355U AR-M355 AR-M455 Operation Manual Suite - Page 189
Setting The Printer Driver - pcl6 driver
 |
View all Sharp AR-M355U manuals
Add to My Manuals
Save this manual to your list of manuals |
Page 189 highlights
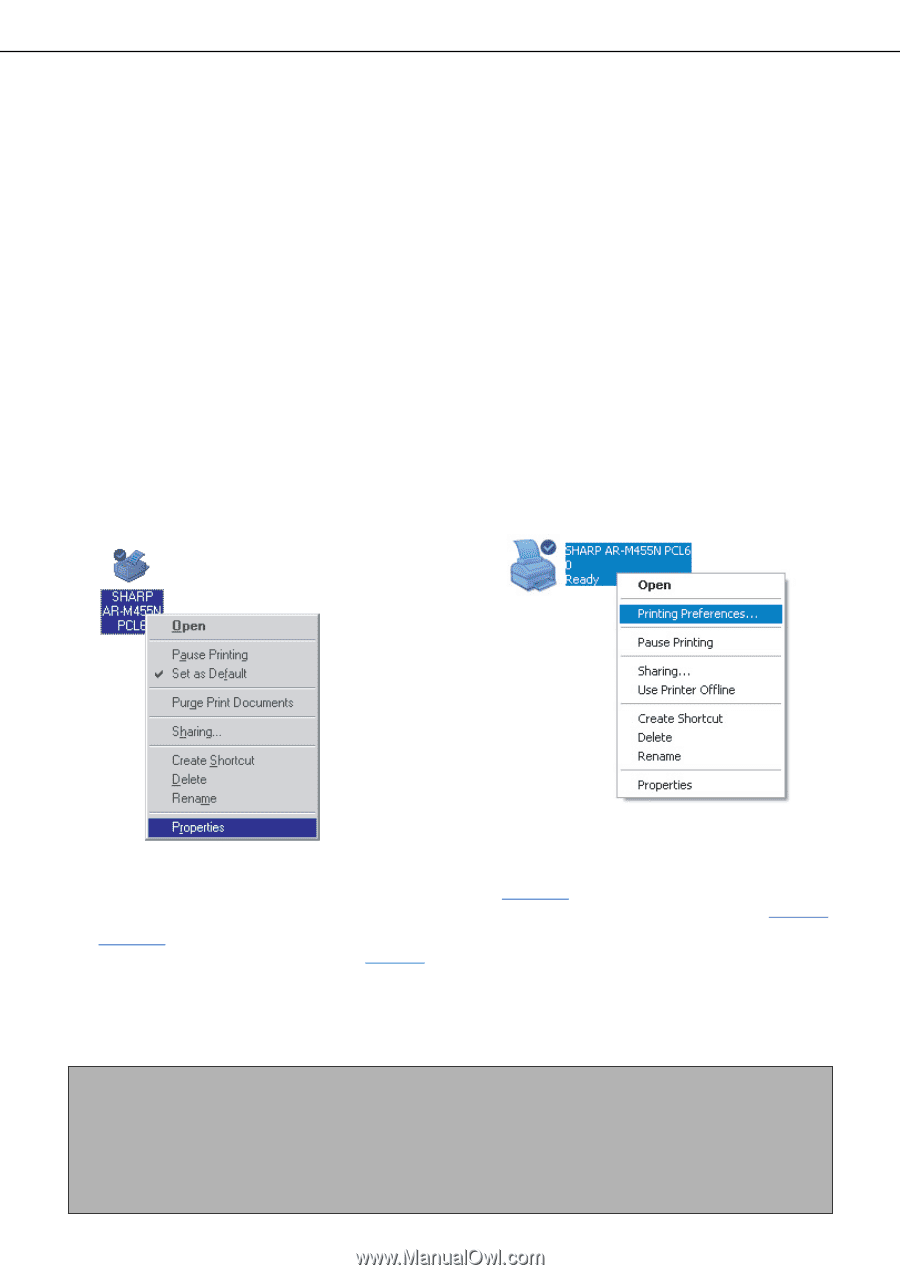
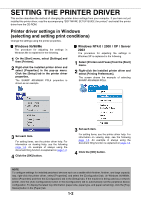
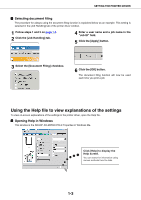
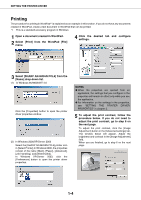
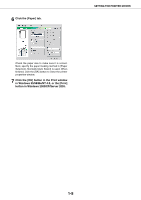
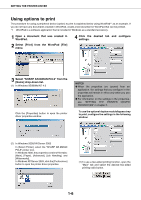
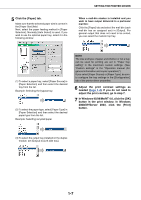
SETTING THE PRINTER DRIVER This section describes the method of changing the printer driver settings from your computer. If you have not yet installed the printer driver, read the accompanying "SOFTWARE SETUP GUIDE (for printer)" and install the printer driver from the CD-ROM. Printer driver settings in Windows (selecting and setting print conditions) Change the settings using the printer properties. I Windows 95/98/Me The procedure for adjusting the settings in Windows Me is explained in the following. 1 On the [Start] menu, select [Settings] and then [Printers]. 2 Right-click the installed printer driver and select [Properties] in the pop-up menu. Click the [Setup] tab in the printer driver properties. The SHARP AR-M455N PCL6 properties is shown as an example. I Windows NT4.0 / 2000 / XP / Server 2003 The procedure for adjusting the settings in Windows XP is explained in the following. 1 Select [Printers and Faxes] from the [Start] menu. 2 Right-click the installed printer driver and select [Printing Preferences]. The screen shows the example of selecting SHARP AR-M455N PCL6. 3 Set each item. For setting items, see the printer driver help. For information on viewing Help, see the following page 1-3. An example of always using the document filing function is explained on page 1-3. 4 Click the [OK] button. 3 Set each item. For setting items, see the printer driver help. For information on viewing Help, see the following page 1-3. An example of always using the document filing function is explained on page 1-3. 4 Click the [OK] button. NOTE To configure settings for installed peripheral devices such as a saddle stitch finisher, finisher, and large capacity tray, right-click the printer driver, select [Properties], and select the [Configuration] tab. (In Windows 95/98/Me, select [Properties] and then the [Configuration] tab in the [Setup] tab.) If the machine is being used as a network printer, click the [Auto Configuration] button in the [Configuration] tab to automatically set the peripheral device configuration. To display the latest tray information (paper size, paper type, and paper remaining), click the [Tray Status] button in the [Paper] tab. 1-2
-
 1
1 -
2
-
3
-
4
-
5
-
6
-
7
-
8
-
9
-
10
-
11
-
12
-
13
-
14
-
15
-
16
-
17
-
18
-
19
-
20
-
21
-
22
-
23
-
24
-
25
-
26
-
27
-
28
-
29
-
30
-
31
-
32
-
33
-
34
-
35
-
36
-
37
-
38
-
39
-
40
-
41
-
42
-
43
-
44
-
45
-
46
-
47
-
48
-
49
-
50
-
51
-
52
-
53
-
54
-
55
-
56
-
57
-
58
-
59
-
60
-
61
-
62
-
63
-
64
-
65
-
66
-
67
-
68
-
69
-
70
-
71
-
72
-
73
-
74
-
75
-
76
-
77
-
78
-
79
-
80
-
81
-
82
-
83
-
84
-
85
-
86
-
87
-
88
-
89
-
90
-
91
-
92
-
93
-
94
-
95
-
96
-
97
-
98
-
99
-
100
-
101
-
102
-
103
-
104
-
105
-
106
-
107
-
108
-
109
-
110
-
111
-
112
-
113
-
114
-
115
-
116
-
117
-
118
-
119
-
120
-
121
-
122
-
123
-
124
-
125
-
126
-
127
-
128
-
129
-
130
-
131
-
132
-
133
-
134
-
135
-
136
-
137
-
138
-
139
-
140
-
141
-
142
-
143
-
144
-
145
-
146
-
147
-
148
-
149
-
150
-
151
-
152
-
153
-
154
-
155
-
156
-
157
-
158
-
159
-
160
-
161
-
162
-
163
-
164
-
165
-
166
-
167
-
168
-
169
-
170
-
171
-
172
-
173
-
174
-
175
-
176
-
177
-
178
-
179
-
180
-
181
-
182
-
183
-
 184
184 -
 185
185 -
 186
186 -
 187
187 -
 188
188 -
 189
189 -
 190
190 -
 191
191 -
 192
192 -
 193
193 -
 194
194 -
195
-
196
-
197
-
198
-
199
-
200
-
201
-
202
-
203
-
204
-
205
-
206
-
207
-
208
-
209
-
210
-
211
-
212
-
213
-
214
-
215
-
216
-
217
-
218
-
219
-
220
-
221
-
222
-
223
-
224
-
225
-
226
-
227
-
228
-
229
-
230
-
231
-
232
-
233
-
234
-
235
-
236
-
237
-
238
-
239
-
240
-
241
-
242
-
243
-
244
-
245
-
246
-
247
-
248
-
249
-
250
-
251
-
252
-
253
-
254
-
255
-
256
-
257
-
258
-
259
-
260
-
261
-
262
-
263
-
264
-
265
-
266
-
267
-
268
-
269
-
270
-
271
-
272
-
273
-
274
-
275
-
276
-
277
-
278
-
279
-
280
-
281
-
282
-
283
-
284
-
285
-
286
-
287
-
288
-
289
-
290
-
291
-
292
-
293
-
294
-
295
-
296
-
297
-
298
-
299
-
300
-
301
-
302
-
303
-
304
-
305
-
306
-
307
-
308
-
309
-
310
-
311
-
312
-
313
-
314
-
315
-
316
-
317
-
318
-
319
-
320
-
321
-
322
-
323
-
324
-
325
-
326
-
327
-
328
-
329
-
330
-
331
-
332
-
333
-
334
-
335
-
336
-
337
-
338
-
339
-
340
-
341
-
342
-
343
-
344
-
345
-
346
-
347
-
348
-
349
-
350
-
351
-
352
-
353
-
354
-
355
-
356
-
357
-
358
-
359
-
360
-
361
-
362
-
363
-
364
-
365
-
366
-
367
-
368
-
369
-
370
-
371
-
372
-
373
-
374
-
375
-
376
-
377
-
378
-
379
-
380
 |
 |