Sharp AR-M355U AR-M355 AR-M455 Operation Manual Suite - Page 228
Procedure for using key operator programs
 |
View all Sharp AR-M355U manuals
Add to My Manuals
Save this manual to your list of manuals |
Page 228 highlights
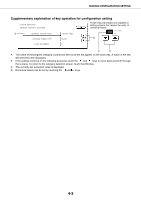
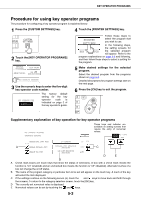
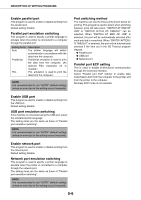
KEY OPERATOR PROGRAMS Procedure for using key operator programs The procedure for configuring a key operator program is explained below. 1 Press the [CUSTOM SETTINGS] key. 4 Touch the [PRINTER SETTINGS] key. 2 Touch the [KEY OPERATOR PROGRAMS] key. DEFAULT SETTINGS LIST PRINT SENDER CONTOROL FAX DATA RECEIVE/FORWARD KEY OPERATOR PROGRAMS 3 Use the numeric keys to enter the five-digit key operator code number. KEY OPERATOR CODE The factory default setting for the key operator code is indicated on page 2 of the key operator's guide. Follow these steps to PRINTER SETTINGS select the program that you wish to use. In the following steps, the setting screens for KEY OPERATOR the selected program proOgraEm exHplaNnGaEtions will appear. Refer to the on page 5-5 and following, and then follow these steps to select a setting for the program. 5 Make desired settings for the selected program. Select the desired program from the programs shown on page 5-2. Detailed descriptions for program settings start on the next page. 6 Press the [CA] key to exit the program. Supplementary explanation of key operation for key operator programs KEY OPERATOR PROGRAMS INTERFACE SETTINGS These keys and indicator are available on setting screens that require the entry of numerical values. OK 20 (1 999) HEXADECIMAL DUMP MODE I/O TIMEOUT 20 1/2 A ENABLE PARALLEL PORT PARALLEL PORT EMULATION SWITCHING AUTO C ENABLE USB PORT USB PORT EMULATION SWITCHING AUTO D E B A Check mark boxes are touch keys that show the status of selections. A box with a check mark means the function is "on" (enabled) and an unchecked box means the function is "off" (disabled). Alternate touches of a box will change the on/off status. B The name of the program category or particular item to be set will appear on the touch key. A touch of the key will select the item displayed. C If the settings continue on the following screen (s), touch the and keys to move back and forth through the screens. To return to the category selection screen, touch the [OK] key. D The currently set numerical value is displayed. E Numerical values can be set by touching the and keys. 5-3
-
 1
1 -
2
-
3
-
4
-
5
-
6
-
7
-
8
-
9
-
10
-
11
-
12
-
13
-
14
-
15
-
16
-
17
-
18
-
19
-
20
-
21
-
22
-
23
-
24
-
25
-
26
-
27
-
28
-
29
-
30
-
31
-
32
-
33
-
34
-
35
-
36
-
37
-
38
-
39
-
40
-
41
-
42
-
43
-
44
-
45
-
46
-
47
-
48
-
49
-
50
-
51
-
52
-
53
-
54
-
55
-
56
-
57
-
58
-
59
-
60
-
61
-
62
-
63
-
64
-
65
-
66
-
67
-
68
-
69
-
70
-
71
-
72
-
73
-
74
-
75
-
76
-
77
-
78
-
79
-
80
-
81
-
82
-
83
-
84
-
85
-
86
-
87
-
88
-
89
-
90
-
91
-
92
-
93
-
94
-
95
-
96
-
97
-
98
-
99
-
100
-
101
-
102
-
103
-
104
-
105
-
106
-
107
-
108
-
109
-
110
-
111
-
112
-
113
-
114
-
115
-
116
-
117
-
118
-
119
-
120
-
121
-
122
-
123
-
124
-
125
-
126
-
127
-
128
-
129
-
130
-
131
-
132
-
133
-
134
-
135
-
136
-
137
-
138
-
139
-
140
-
141
-
142
-
143
-
144
-
145
-
146
-
147
-
148
-
149
-
150
-
151
-
152
-
153
-
154
-
155
-
156
-
157
-
158
-
159
-
160
-
161
-
162
-
163
-
164
-
165
-
166
-
167
-
168
-
169
-
170
-
171
-
172
-
173
-
174
-
175
-
176
-
177
-
178
-
179
-
180
-
181
-
182
-
183
-
184
-
185
-
186
-
187
-
188
-
189
-
190
-
191
-
192
-
193
-
194
-
195
-
196
-
197
-
198
-
199
-
200
-
201
-
202
-
203
-
204
-
205
-
206
-
207
-
208
-
209
-
210
-
211
-
212
-
213
-
214
-
215
-
216
-
217
-
218
-
219
-
220
-
221
-
222
-
 223
223 -
 224
224 -
 225
225 -
 226
226 -
 227
227 -
 228
228 -
 229
229 -
 230
230 -
 231
231 -
 232
232 -
 233
233 -
234
-
235
-
236
-
237
-
238
-
239
-
240
-
241
-
242
-
243
-
244
-
245
-
246
-
247
-
248
-
249
-
250
-
251
-
252
-
253
-
254
-
255
-
256
-
257
-
258
-
259
-
260
-
261
-
262
-
263
-
264
-
265
-
266
-
267
-
268
-
269
-
270
-
271
-
272
-
273
-
274
-
275
-
276
-
277
-
278
-
279
-
280
-
281
-
282
-
283
-
284
-
285
-
286
-
287
-
288
-
289
-
290
-
291
-
292
-
293
-
294
-
295
-
296
-
297
-
298
-
299
-
300
-
301
-
302
-
303
-
304
-
305
-
306
-
307
-
308
-
309
-
310
-
311
-
312
-
313
-
314
-
315
-
316
-
317
-
318
-
319
-
320
-
321
-
322
-
323
-
324
-
325
-
326
-
327
-
328
-
329
-
330
-
331
-
332
-
333
-
334
-
335
-
336
-
337
-
338
-
339
-
340
-
341
-
342
-
343
-
344
-
345
-
346
-
347
-
348
-
349
-
350
-
351
-
352
-
353
-
354
-
355
-
356
-
357
-
358
-
359
-
360
-
361
-
362
-
363
-
364
-
365
-
366
-
367
-
368
-
369
-
370
-
371
-
372
-
373
-
374
-
375
-
376
-
377
-
378
-
379
-
380
 |
 |
