Sharp AR-M355U AR-M355 AR-M455 Operation Manual Suite - Page 209
Settings in the [Watermarks] tab, On First Only
 |
View all Sharp AR-M355U manuals
Add to My Manuals
Save this manual to your list of manuals |
Page 209 highlights
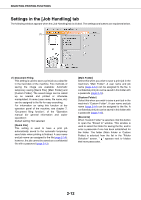
SELECTING PRINTING FUNCTIONS Settings in the [Watermarks] tab The following window appears when the [Watermarks] tab is clicked. The settings and buttons are explained below. (4) (1) (5) (6) (7) (8) (9) (10) (2) (3) (1) Watermark preview The watermark function is used to print a watermark (a faint, shadowlike text image) on the paper. This shows a preview of the currently selected watermark. The position of the watermark can be adjusted by directly dragging the image with your mouse, or by using the scrollbars at the right and bottom of the preview screen. Default setting: x: 0, y: 0 NOTE The image that appears in the Watermark Preview is an approximate representation of what will appear in the print. [Center] Select this setting to have the watermark printed in the center of the paper. (2) Size Use this setting to adjust the size of the characters of the currently selected watermark. Any number from 6 points to 300 points can be selected. Default setting: 200 (points) (3) Angle Use this setting to adjust the angle of the text of the currently selected watermark. Select any angle from -90° to 90°. Default setting: 45° (4) Watermark Select a watermark from the watermarks that appear in the box. Default setting: None [Add] Click this button to create a custom watermark. [Update] Click this button to adjust the size or angle of the text of a stored watermark. [Delete] Click this button to delete a stored watermark. (5) Text When you wish to create a custom watermark, enter the text of the watermark here. Up to 100 characters can be entered. To store the entered text as a watermark, click the [Add] button explained in (4) above. (6) Gray Scale Use this setting to adjust the color of the font of the currently selected watermark. Any value from 0 to 255 points can be selected. Default setting: 192 (7) Edit Fonts Use this setting to select the font of the currently selected watermark. (8) Transparent Text Select this checkbox when you wish to have the characters of the watermark printed faintly in the background of the text. Default setting: Selected (9) On First Page Only Select this checkbox when you want to have a watermark printed on only the first page of a print job. Default setting: Not selected (10)As Outline Only Select this checkbox when you want to print only the outline of the characters of a watermark. Default setting: Not selected This setting cannot be selected when setting (8) is selected. 2-15
-
 1
1 -
2
-
3
-
4
-
5
-
6
-
7
-
8
-
9
-
10
-
11
-
12
-
13
-
14
-
15
-
16
-
17
-
18
-
19
-
20
-
21
-
22
-
23
-
24
-
25
-
26
-
27
-
28
-
29
-
30
-
31
-
32
-
33
-
34
-
35
-
36
-
37
-
38
-
39
-
40
-
41
-
42
-
43
-
44
-
45
-
46
-
47
-
48
-
49
-
50
-
51
-
52
-
53
-
54
-
55
-
56
-
57
-
58
-
59
-
60
-
61
-
62
-
63
-
64
-
65
-
66
-
67
-
68
-
69
-
70
-
71
-
72
-
73
-
74
-
75
-
76
-
77
-
78
-
79
-
80
-
81
-
82
-
83
-
84
-
85
-
86
-
87
-
88
-
89
-
90
-
91
-
92
-
93
-
94
-
95
-
96
-
97
-
98
-
99
-
100
-
101
-
102
-
103
-
104
-
105
-
106
-
107
-
108
-
109
-
110
-
111
-
112
-
113
-
114
-
115
-
116
-
117
-
118
-
119
-
120
-
121
-
122
-
123
-
124
-
125
-
126
-
127
-
128
-
129
-
130
-
131
-
132
-
133
-
134
-
135
-
136
-
137
-
138
-
139
-
140
-
141
-
142
-
143
-
144
-
145
-
146
-
147
-
148
-
149
-
150
-
151
-
152
-
153
-
154
-
155
-
156
-
157
-
158
-
159
-
160
-
161
-
162
-
163
-
164
-
165
-
166
-
167
-
168
-
169
-
170
-
171
-
172
-
173
-
174
-
175
-
176
-
177
-
178
-
179
-
180
-
181
-
182
-
183
-
184
-
185
-
186
-
187
-
188
-
189
-
190
-
191
-
192
-
193
-
194
-
195
-
196
-
197
-
198
-
199
-
200
-
201
-
202
-
203
-
 204
204 -
 205
205 -
 206
206 -
 207
207 -
 208
208 -
 209
209 -
 210
210 -
 211
211 -
 212
212 -
 213
213 -
 214
214 -
215
-
216
-
217
-
218
-
219
-
220
-
221
-
222
-
223
-
224
-
225
-
226
-
227
-
228
-
229
-
230
-
231
-
232
-
233
-
234
-
235
-
236
-
237
-
238
-
239
-
240
-
241
-
242
-
243
-
244
-
245
-
246
-
247
-
248
-
249
-
250
-
251
-
252
-
253
-
254
-
255
-
256
-
257
-
258
-
259
-
260
-
261
-
262
-
263
-
264
-
265
-
266
-
267
-
268
-
269
-
270
-
271
-
272
-
273
-
274
-
275
-
276
-
277
-
278
-
279
-
280
-
281
-
282
-
283
-
284
-
285
-
286
-
287
-
288
-
289
-
290
-
291
-
292
-
293
-
294
-
295
-
296
-
297
-
298
-
299
-
300
-
301
-
302
-
303
-
304
-
305
-
306
-
307
-
308
-
309
-
310
-
311
-
312
-
313
-
314
-
315
-
316
-
317
-
318
-
319
-
320
-
321
-
322
-
323
-
324
-
325
-
326
-
327
-
328
-
329
-
330
-
331
-
332
-
333
-
334
-
335
-
336
-
337
-
338
-
339
-
340
-
341
-
342
-
343
-
344
-
345
-
346
-
347
-
348
-
349
-
350
-
351
-
352
-
353
-
354
-
355
-
356
-
357
-
358
-
359
-
360
-
361
-
362
-
363
-
364
-
365
-
366
-
367
-
368
-
369
-
370
-
371
-
372
-
373
-
374
-
375
-
376
-
377
-
378
-
379
-
380
 |
 |
