Sharp AX-1100R AX-1100 Operation Manual - Page 14
Part Names
 |
View all Sharp AX-1100R manuals
Add to My Manuals
Save this manual to your list of manuals |
Page 14 highlights
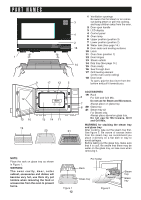
PART NAMES 1 9 17 3 4 2 18 14 13 5 1 Ventilation openings Be aware that hot steam or air comes out during steam or grill mix cooking, and keep children away from the oven. 2 Door open handle 3 LCD display 4 Control panel 5 Oven lamp 6 Upper position (position 3) 7 Lower position (position 2) 8 Water tank (See page 14.) 9 Door seals and sealing surfaces 10 Latch 11 Oven floor (position 1) 12 Door hinges 13 Steam outlets 14 Drip tray (See page 14.) 15 Oven cavity 16 See through door 17 Grill heating element (at the oven cavity ceiling) 18 Door lever To open, grip the door lever from the bottom and pull it towards you. 12 10 16 19 15 14 11 20 21 NOTE: Place the rack on glass tray as shown in Figure 1. WARNING: The oven cavity, door, outer cabinet, accessories and dishes will become very hot, use thick dry pot holders when removing the food or accessories from the oven to prevent burns. Figure 1 12 ACCESSORIES 19 Rack 6 For Grill and Grill Mix. Do not use for Steam and Microwave. 7 Always place on glass tray. 8 20 Glass tray 21 Steam tray x2 For Steam only. Always place above/on glass tray. Do not use for Microwave, Grill and Grill Mix. WARNING for stacking the steam tray and glass tray: After cooking, take out the steam tray first. See figure 2. Be aware of excess water from the steam tray, we recommend you place it directly on a flat dish or tray to avoid spillages. Before taking out the glass tray, make sure that it is cool. Be aware that there may be water on the glass tray, so take care when removing it. Pot holder Rack Glass tray Figure 2 Steam tray Glass tray
-
 1
1 -
2
-
3
-
4
-
5
-
6
-
7
-
8
-
 9
9 -
 10
10 -
 11
11 -
 12
12 -
 13
13 -
 14
14 -
 15
15 -
 16
16 -
 17
17 -
 18
18 -
 19
19 -
20
-
21
-
22
-
23
-
24
-
25
-
26
-
27
-
28
-
29
-
30
-
31
-
32
-
33
-
34
-
35
-
36
-
37
-
38
-
39
-
40
-
41
-
42
-
43
-
44
-
45
-
46
-
47
-
48
-
49
-
50
-
51
-
52
-
53
-
54
-
55
-
56
-
57
-
58
-
59
-
60
-
61
-
62
-
63
-
64
-
65
-
66
-
67
-
68
-
69
-
70
-
71
-
72
-
73
-
74
-
75
-
76
-
77
-
78
-
79
-
80
-
81
-
82
-
83
-
84
-
85
-
86
-
87
-
88
-
89
-
90
-
91
-
92
 |
 |
