Sharp AX-1100R AX-1100 Operation Manual - Page 22
Auto Grill Chart
 |
View all Sharp AX-1100R manuals
Add to My Manuals
Save this manual to your list of manuals |
Page 22 highlights
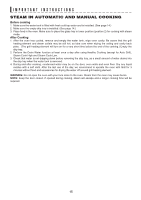
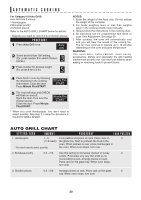
AUTOMATIC COOKING For Category 6 (Auto Grill): Auto Grill has 3 menus. 1 Hamburgers 2 Boneless poultry 3 Chicken pieces Refer to the AUTO GRILL CHART below for details. * Suppose you want to cook 0.5 lb of chicken pieces. PROCEDURE 1 Press Auto Grill once. 2 Select desired Auto Grill setting. (Ex: press number 3 to select Chicken pieces.) 3* Press number for desired weight. (Ex: press 5 for 0.5 lb.) NOTES: 1. Enter the weight of the food only. Do not include the weight of the container. 2. For foods weighing more or less than weights given in the cooking charts, cook manually. 3. Always follow the instructions in the cooking chart. 4. All selections can be programmed with More or Less Time Adjustment. See page 29. 5. After cooking, the oven will automatically cool and you will hear the sound of the cooling fan. The fan may continue to operate up to 10 minutes depending on the oven and parts temperature. WARNING: The oven door, outer cabinet, oven cavity, accessories, dishes and especially the grill heating element will become hot. Use thick pot holders when adding or removing foods to prevent burns. 4 Place food in oven by following the directions in the cooking chart below. Close the door. Press Minute Plus/START. 5 The oven will stop and CHECK will flash on and off. Open the door. Turn over the chicken pieces. Close the door. Press Minute Plus/START. * When you cook Hamburgers. You don't need to select quantity. Skip step 3. Follow the directions in the AUTO GRILL CHART. AUTO GRILL CHART SETTING FOOD AMOUNT PROCEDURE FOOD POSITON 1. Hamburgers 1 - 5 Form patties and place on rack. Place rack on 3 (1/4 lb each) the glass tray. Start to preheat. No food in the oven. When preheat is over, place hamburgers in * You don't need to select quantity. the oven. When oven stops, turn over. 2. Boneless poultry 0.5 - 2 lb Use this setting for boneless chicken or turkey 2 cutlets. Fold under any very thin ends so no overcooking occurs. Arrange pieces on rack. Place rack on the glass tray. When oven stops, turn over. 3. Chicken pieces 0.5 - 3 lb Arrange pieces on rack. Place rack on the glass 2 tray. When oven stops, turn over. 20
-
 1
1 -
2
-
3
-
4
-
5
-
6
-
7
-
8
-
9
-
10
-
11
-
12
-
13
-
14
-
15
-
16
-
 17
17 -
 18
18 -
 19
19 -
 20
20 -
 21
21 -
 22
22 -
 23
23 -
 24
24 -
 25
25 -
 26
26 -
 27
27 -
28
-
29
-
30
-
31
-
32
-
33
-
34
-
35
-
36
-
37
-
38
-
39
-
40
-
41
-
42
-
43
-
44
-
45
-
46
-
47
-
48
-
49
-
50
-
51
-
52
-
53
-
54
-
55
-
56
-
57
-
58
-
59
-
60
-
61
-
62
-
63
-
64
-
65
-
66
-
67
-
68
-
69
-
70
-
71
-
72
-
73
-
74
-
75
-
76
-
77
-
78
-
79
-
80
-
81
-
82
-
83
-
84
-
85
-
86
-
87
-
88
-
89
-
90
-
91
-
92
 |
 |
