Sharp AX-1100R AX-1100 Operation Manual - Page 32
Kitchen Timer, Minute Plus
 |
View all Sharp AX-1100R manuals
Add to My Manuals
Save this manual to your list of manuals |
Page 32 highlights
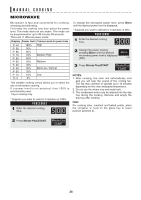
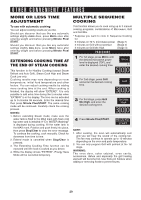
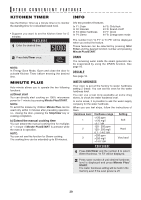
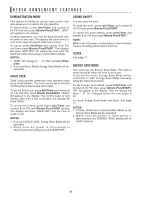
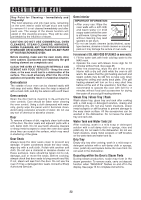
OTHER CONVENIENT FEATURES KITCHEN TIMER INFO Use the Kitchen Timer as a minute timer or to monitor the standing time for cooked/defrosted food. • Suppose you want to set the kitchen timer for 5 minutes. PROCEDURE 1 Enter the desired time. Info key provides 8 features. In F1: Drain In F2: Descale In F3: Water hardness In F4: Demo In F5: Child lock In F6: Sound on/off In F7: Clock In F8: Energy save mode The number from "In F1" to "In F8" will be displayed when you select the feature. These features can be selected by pressing Info/ Timer and the desired function number and pressing Minute Plus/START. 2 Press Info/Timer once. NOTE: In Energy Save Mode, Open and close the door to activate Kitchen Timer before entering the desired time. MINUTE PLUS Auto minute allows you to operate the two following functions: a) Direct start You can directly start cooking on 100% microwave power for 1 minute by pressing Minute Plus/START. NOTE: To avoid the misuse by children Minute Plus can be used only within 3 minutes after preceding operation, i.e., closing the door, pressing the Stop/Clear key or cooking completion. b) Extend the manual cooking time You can extend the manual cooking time for multiples of 1 minute if Minute Plus/START is pressed while the oven is in operation. NOTE: You can not use this function for Steam cooking. The cooking time can be extended up to 99 minutes. DRAIN The remaining water inside the steam generator can be evaporated by using the DRAIN function. See page 16. DESCALE See page 16. WATER HARDNESS Your oven is set at the factory to water hardness setting 2 (hard). You can set the oven for the water hardness level. You can use a test strip available at some drug stores, to check the water hardness level. In some areas, it is possible to ask the water supply company for the water hardness. When you use test strips, follow the instructions of them. Hardness level 1 2 3 Hardness range 14.0 °dH Setting Soft Hard Very hard PROCEDURE 1 Press Info/Timer and the number 3 to select Water Hardness. "In F3" will be displayed. 2 Press same number 3 until desired hardness level is displayed and press Minute Plus/ START. The water hardness setting will be held in the memory even if the oven power is off. 30
-
 1
1 -
2
-
3
-
4
-
5
-
6
-
7
-
8
-
9
-
10
-
11
-
12
-
13
-
14
-
15
-
16
-
17
-
18
-
19
-
20
-
21
-
22
-
23
-
24
-
25
-
26
-
 27
27 -
 28
28 -
 29
29 -
 30
30 -
 31
31 -
 32
32 -
 33
33 -
 34
34 -
 35
35 -
 36
36 -
 37
37 -
38
-
39
-
40
-
41
-
42
-
43
-
44
-
45
-
46
-
47
-
48
-
49
-
50
-
51
-
52
-
53
-
54
-
55
-
56
-
57
-
58
-
59
-
60
-
61
-
62
-
63
-
64
-
65
-
66
-
67
-
68
-
69
-
70
-
71
-
72
-
73
-
74
-
75
-
76
-
77
-
78
-
79
-
80
-
81
-
82
-
83
-
84
-
85
-
86
-
87
-
88
-
89
-
90
-
91
-
92
 |
 |