Sharp AX-1100R AX-1100 Operation Manual - Page 16
Important Instructions
 |
View all Sharp AX-1100R manuals
Add to My Manuals
Save this manual to your list of manuals |
Page 16 highlights
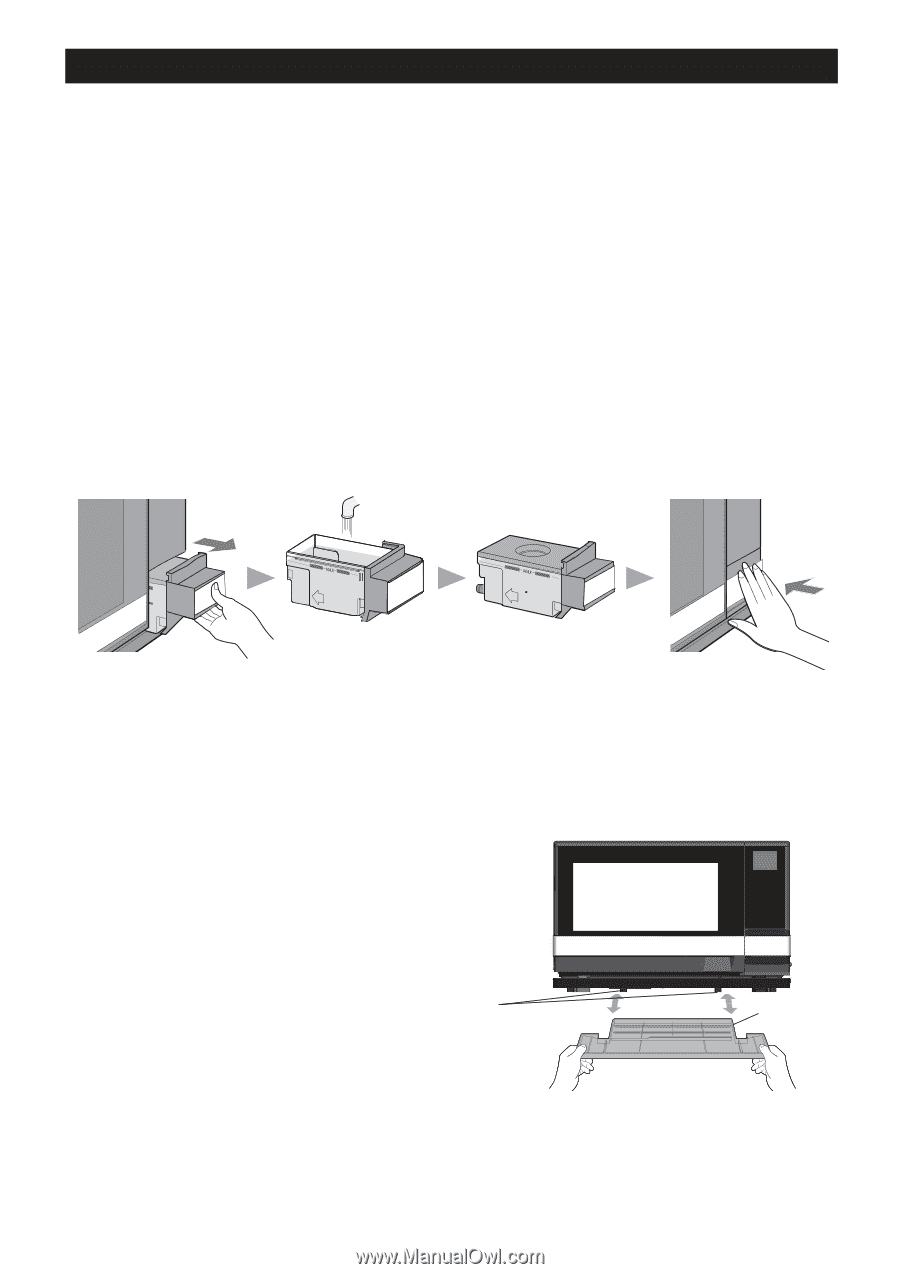
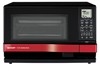
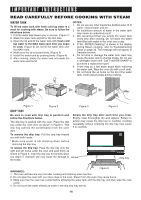
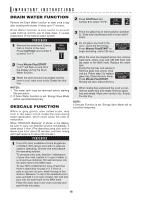
IMPORTANT INSTRUCTIONS READ CAREFULLY BEFORE COOKING WITH STEAM WATER TANK To fill the water tank with fresh cold tap water is a must for cooking with steam. Be sure to follow the directions below. 1. Pull the water tank toward you to remove. (Figure 1) 2. Wash the water tank and lid for the first time. 3. Open the lid and fill the water tank with fresh cold tap water to the MAX mark each time you begin to cook. (Figure 2) Do not fill the water tank over the MAX mark. 4. Make sure the lid is closed firmly. (Figure 3) 5. Install the water tank by pushing firmly. (Figure 4) 6. After cooking, empty the water tank and wash the water tank and the lid. NOTES: 1. Do not use any other liquids like distilled water, R.O water, mineral water and etc. 2. An insufficient amount of water in the water tank may cause an undesired result. 3. We recommend that you empty the water tank every time after cooking. Do not leave the water tank filled with water in the oven over a day. 4. If "Err, WATER (flashing)" is shown in the display during Steam cooking, refer to Troubleshooting Chart on page 33. The message will not appear in Descale function. 5. Do not drop or damage the water tank. Heat may cause the water tank to change shape. Do not use a damaged water tank. Call 1-800-BE-SHARP to purchase a replacement part. 6. There may be a few water drops when removing the water tank. Wipe the oven dry with a soft cloth. 7. Do not block the air holes on the lid of the water tank. It will cause trouble during cooking. Figure 1 Figure 2 Figure 3 Figure 4 DRIP TRAY Be sure to cook with drip tray in position and follow the directions below. The drip tray is packed with the oven. Place the drip tray under the oven door as shown in Figure 5. This drip tray collects the condensation from the oven door. Empty the drip tray after each time you cook. Empty, rinse thoroughly, dry and replace. Failure to empty may cause the drip tray to overflow. Cooking repeatedly without emptying the drip tray may cause it to overflow. To remove the drip tray: Pull the drip tray toward you with both hands. * Make sure water is not dripping down before removing the drip tray. To replace the drip tray: Place the drip tray onto the right and left hooks under the oven and push firmly as shown in Figure 5. Insert the drip tray horizontally when you attach it. Improper use may cause the damage to Hooks the hooks. Drip tray Figure 5 WARNINGS: 1. The oven will become very hot after cooking and draining water function. 2. Do not open the oven with your face close to the oven. Steam from the oven may cause burns. 3. Make sure that the oven has cooled before emptying the water tank and the drip tray and then wipe the oven cavity. 4. Do not touch the water directly as water in the drip tray may be hot. 14
-
 1
1 -
2
-
3
-
4
-
5
-
6
-
7
-
8
-
9
-
10
-
 11
11 -
 12
12 -
 13
13 -
 14
14 -
 15
15 -
 16
16 -
 17
17 -
 18
18 -
 19
19 -
 20
20 -
 21
21 -
22
-
23
-
24
-
25
-
26
-
27
-
28
-
29
-
30
-
31
-
32
-
33
-
34
-
35
-
36
-
37
-
38
-
39
-
40
-
41
-
42
-
43
-
44
-
45
-
46
-
47
-
48
-
49
-
50
-
51
-
52
-
53
-
54
-
55
-
56
-
57
-
58
-
59
-
60
-
61
-
62
-
63
-
64
-
65
-
66
-
67
-
68
-
69
-
70
-
71
-
72
-
73
-
74
-
75
-
76
-
77
-
78
-
79
-
80
-
81
-
82
-
83
-
84
-
85
-
86
-
87
-
88
-
89
-
90
-
91
-
92
 |
 |