Sharp BD-HP20U BD-HP20U Operation Manual - Page 17
Connecting to the Component Jacks, This Player, Video equipment with component jacks - blu ray
 |
UPC - 074000354791
View all Sharp BD-HP20U manuals
Add to My Manuals
Save this manual to your list of manuals |
Page 17 highlights
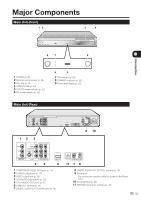
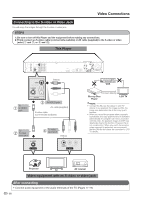
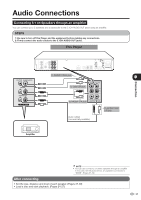
Video Connections Connecting to the Component Jacks You will enjoy accurate color reproduction and high quality images through the component jacks. STEPS 1: Be sure to turn off this Player and the equipment before making any connections. 2: Firmly connect a component video cable (commercially available) to the component jacks (1 and 2). Caution: • HDMI output and Component Video output can not be used at the same time. This Player o Connection (Red) (Blue) (Green) 1 To COMPONENT VIDEO OUT jacks Component video cable (commercially available) 2 To component video input jacks (Red) (Blue) (Green) COMPONENT IN PR (CR) PB (CB) Y Caution: • Press HDMI button for 5 seconds, and the change of "Component Video Out" and "HDMI Out" is possible. • Even when there is no cable connected to the HDMI video out, switching the output to HO-out (HDMI video out) is still possible. When HO-out is selected, there will be no signal from the Component video out. VCR Connect directly Blu-ray Disc Player LCD TV NOTE • Connect the Blu-ray disc player to LCD TV directly. If you playback the image via VCR, the image may deteriorate due to the copy guard function. • When you record the program where copyright is protected, the copy guard function is activated automatically; the program can not be recorded correctly. Also, the playback image via VCR may deteriorate due to this function. However, this is not a malfunction. When you watch the program where copyright is protected, we recommend that the Blu-ray disc player be connected to LCD TV directly. Projector TV AV receiver Video equipment with component jacks After connecting • Connect audio equipment or the audio terminals of the TV. (Pages 17-19) 15
-
 1
1 -
2
-
3
-
4
-
5
-
6
-
7
-
8
-
9
-
10
-
11
-
 12
12 -
 13
13 -
 14
14 -
 15
15 -
 16
16 -
 17
17 -
 18
18 -
 19
19 -
 20
20 -
 21
21 -
 22
22 -
23
-
24
-
25
-
26
-
27
-
28
-
29
-
30
-
31
-
32
-
33
-
34
-
35
-
36
-
37
-
38
-
39
-
40
-
41
-
42
-
43
-
44
-
45
-
46
-
47
-
48
-
49
-
50
-
51
-
52
-
53
-
54
-
55
-
56
-
57
-
58
 |
 |