Sharp MX-M363N Installation Manual - Page 100
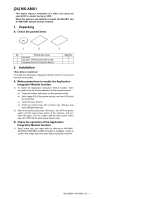
MX-AMX3, 1. Unpacking, A. Check the packed items, 2. Installation, A. Make preparations for enabling - default administrator password
 |
View all Sharp MX-M363N manuals
Add to My Manuals
Save this manual to your list of manuals |
Page 100 highlights
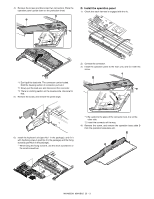
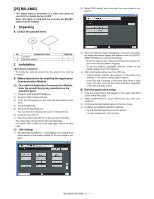
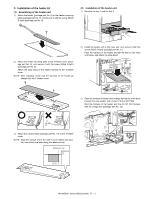
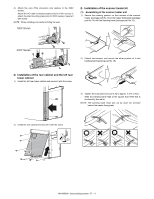
[M2X-6M]50M3NX-AMX3 * This option requires installation of a HDD, and cannot be used with the models having no HDD. When this option is used with the U model, the MX-PB11 option must be installed. 1. Unpacking A. Check the packed items S2)erWvhiecne"OMSaAnsuetatilng" key is touched, the menu below is displayed. 1 2 No. Packed part names 1 CD-ROM 2 Operation manual Quantity 1 1 2. Installation * To enable the external account kit, the product key must be acquired. A. Make preparations for enabling the external account kit. (1) To enable the external account kit, enter the product key by key operations on the operation panel. 1) Press [SYSTEM SETTINGS] key. 2) Touch [Administrator Password] key. 3) Touch [Password] key and enter the administrator password. 4) Touch [OK] key. 5) Scroll the screen, and touch [Product Key] key. 6) Touch the input column. 7) Enter the product key with 10-key, and touch [OK] key. • The product key can be entered from the Web page. For details, refer to [HELP] on the right upper side of the Web page. (2) Make the OSA setting. 1) By the procedure of (1), "OSA setting" key is added to the menu screen of the system setting or the key operator program. 3) When [External Account Setting] key is touched, the screen for setting the calculation by the external application and for enabling user authentication is displayed. (The two settings are linked together.) • When the check box of [External Account Management is Enabled] is checked: The result of the job completion is notified to the external application set on the Web page. (The default is "Disabled.") • If the check box is OFF, check cannot be made. • When the check box of [Authentication by the External Account Application is Enabled] is checked: When the machine is booted, the login screen can be acquired from the application set on the Web page. (The default is "Disabled.") 4) After setting, when [OK] key on the force account setting screen is touched, the message to urge rebooting of the machine is displayed. To enable the setting, touch [OK] key and reboot the machine. B. Set the external application. 1) Click [Login] button on the right upper side of the Web page. 2) Select [Administrator] from [Login Name] and enter the pass- word. 3) Click [External Application Setting] on the menu frame. 4) Click [External Account]. 5) Set the external account application. • For each setting item, refer to [HELP]. To enable the setting on the Web page, reboot the machine. MX-M503N MX-AMX3 26 - 1
-
 1
1 -
2
-
3
-
4
-
5
-
6
-
7
-
8
-
9
-
10
-
11
-
12
-
13
-
14
-
15
-
16
-
17
-
18
-
19
-
20
-
21
-
22
-
23
-
24
-
25
-
26
-
27
-
28
-
29
-
30
-
31
-
32
-
33
-
34
-
35
-
36
-
37
-
38
-
39
-
40
-
41
-
42
-
43
-
44
-
45
-
46
-
47
-
48
-
49
-
50
-
51
-
52
-
53
-
54
-
55
-
56
-
57
-
58
-
59
-
60
-
61
-
62
-
63
-
64
-
65
-
66
-
67
-
68
-
69
-
70
-
71
-
72
-
73
-
74
-
75
-
76
-
77
-
78
-
79
-
80
-
81
-
82
-
83
-
84
-
85
-
86
-
87
-
88
-
89
-
90
-
91
-
92
-
93
-
94
-
 95
95 -
 96
96 -
 97
97 -
 98
98 -
 99
99 -
 100
100 -
 101
101 -
 102
102 -
 103
103 -
 104
104 -
 105
105 -
106
-
107
-
108
-
109
-
110
-
111
-
112
-
113
-
114
-
115
-
116
-
117
 |
 |
