Sharp MX-M363N Installation Manual - Page 63
E. Adjustment, F. Install to main unit
 |
View all Sharp MX-M363N manuals
Add to My Manuals
Save this manual to your list of manuals |
Page 63 highlights
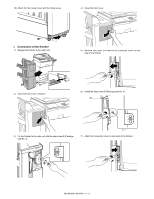
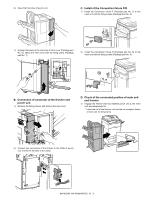
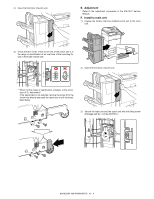
2) Open the front door of punch unit. E. Adjustment * Refer to the adjustment procedures in the MX-FN11 Service Manual. F. Install to main unit 1) Engage the finisher that has installed punch unit to the main unit. 3) Check that the center of the screw hole of the punch unit is in the range of specification of an oval hole of the mounting fixture in front side of main unit. 2) Open the front door of punch unit. * When not the range of specification, progress to the procedure of "E. Adjustment". If the adjustment is not required, remove the screw from the screw hole directly and push the caster into it until the installation fixing. 3) Secure the main unit and the punch unit with the fixing screw (Package part No. 4 of the MX-FN11). MX-M503N MX-PNX6A/B/C/D 10 - 4
-
 1
1 -
2
-
3
-
4
-
5
-
6
-
7
-
8
-
9
-
10
-
11
-
12
-
13
-
14
-
15
-
16
-
17
-
18
-
19
-
20
-
21
-
22
-
23
-
24
-
25
-
26
-
27
-
28
-
29
-
30
-
31
-
32
-
33
-
34
-
35
-
36
-
37
-
38
-
39
-
40
-
41
-
42
-
43
-
44
-
45
-
46
-
47
-
48
-
49
-
50
-
51
-
52
-
53
-
54
-
55
-
56
-
57
-
 58
58 -
 59
59 -
 60
60 -
 61
61 -
 62
62 -
 63
63 -
 64
64 -
 65
65 -
 66
66 -
 67
67 -
 68
68 -
69
-
70
-
71
-
72
-
73
-
74
-
75
-
76
-
77
-
78
-
79
-
80
-
81
-
82
-
83
-
84
-
85
-
86
-
87
-
88
-
89
-
90
-
91
-
92
-
93
-
94
-
95
-
96
-
97
-
98
-
99
-
100
-
101
-
102
-
103
-
104
-
105
-
106
-
107
-
108
-
109
-
110
-
111
-
112
-
113
-
114
-
115
-
116
-
117
 |
 |
