Sony Ericsson T18 User Guide - Page 21
Interpreting the Instructions in the Manual, Example:, Interpret this instruction as follows:
 |
View all Sony Ericsson T18 manuals
Add to My Manuals
Save this manual to your list of manuals |
Page 21 highlights
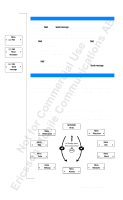
Menu < Mail > Mail < Read > messages Mail < Send > message INTERPRETING THE INSTRUCTIONS IN THE MANUAL Example: • Scroll to Mail, Y ES , Send message, Y ES . Interpret this instruction as follows: 1. From the standby mode, use the L EF T or R IG HT arrow keys to scroll to the Mail menu. The arrows on either side of the word Mail mean that you can scroll to another menu. 2. Press Y ES to select the menu. Now you are in the Mail menu. The name of the menu that you have chosen is shown at the top of the display (Mail). Use the L EF T or R IGH T arrow keys to scroll to the Send message function. 3. Press Y ES to select the function. DISPLAY TEXT AND SYMBOLS When you move through the menu system, the display changes. The following hints can help you: • When arrows are displayed next to the name of a menu or function, there are more options you can scroll through with the R IG HT /L E FT (arrow) keys. • Text in brackets shows the current setting of the function shown in the display. In this manual, we have chosen to exclude some of the details above in the pictures of the displays. This is so that it will be easier for you understand the display texts in the margins. Below is an overview of the default menus. Menu < Phone book > NETWORK 06:01 Menu < Ring level > Menu < Mail > Menu < Info > Menu < Tools > Menu < Divert > Menu < Settings > Menu < Access > Menu < Networks > Using the Menu System 21
-
 1
1 -
2
-
3
-
4
-
5
-
6
-
7
-
8
-
9
-
10
-
11
-
12
-
13
-
14
-
15
-
 16
16 -
 17
17 -
 18
18 -
 19
19 -
 20
20 -
 21
21 -
 22
22 -
 23
23 -
 24
24 -
 25
25 -
 26
26 -
27
-
28
-
29
-
30
-
31
-
32
-
33
-
34
-
35
-
36
-
37
-
38
-
39
-
40
-
41
-
42
-
43
-
44
-
45
-
46
-
47
-
48
-
49
-
50
-
51
-
52
-
53
-
54
-
55
-
56
-
57
-
58
-
59
-
60
-
61
-
62
-
63
-
64
-
65
-
66
-
67
-
68
-
69
-
70
-
71
-
72
-
73
-
74
-
75
-
76
-
77
-
78
-
79
-
80
-
81
-
82
-
83
-
84
-
85
-
86
-
87
-
88
-
89
-
90
-
91
-
92
-
93
-
94
-
95
-
96
 |
 |
