Sony CHC-CL1 Operating Instructions - Page 19
Recording on a tape manually — Manual Recording, Timer recording radio programs, Manual Recording
 |
View all Sony CHC-CL1 manuals
Add to My Manuals
Save this manual to your list of manuals |
Page 19 highlights
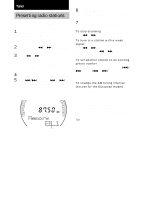
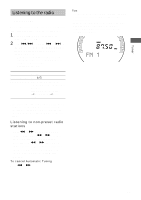
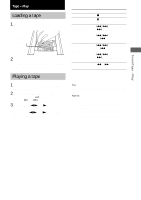
Tape - Recording Recording on a tape manually - Manual Recording You can record just the portions you like from a CD on a tape. You can also record a radio program. The recording level is automatically adjusted. 1 Load a blank tape. 2 Press FUNCTION repeatedly to select the desired source to record. 3 Press REC PAUSE/START. The tape deck stands by for recording. When you want to record on the bottom side, press TAPE nN. 4 Press PLAY MODE/DIRECTION repeatedly until g appears to record on one side or h (or j) to record on both sides. 5 Press REC PAUSE/START and then start playing the desired source to record. Tips • When you record on both sides, be sure to start from the top side. If you start from the bottom side, recording stops at the end of the bottom side. • If you select both sides recording and the tape reaches the end of the top side part-way through a track, the entire track is recorded again from the beginning of the bottom side. Timer recording radio programs To timer record, you must first preset the radio station (see "Presetting radio stations" on page 14) and set the clock (see "Setting the time" on page 8). 1 Tune in the preset radio station (see "Listening to the radio" on page 15). 2 Press CLOCK/TIMER SET on the remote. "DAILY SET ?" appears. 3 Turn ./> (or press . or > on the remote) to select "REC SET ?", then press ENTER/YES on the remote. "ON" appears and the hour indication flashes. 4 Set the time to start recording. Turn ./> (or press . or > on the remote) to set the hour, then press ENTER/YES on the remote. The minute indication flashes. Turn ./> (or press . or > on the remote) to set the minute, then press ENTER/YES on the remote. 5 Set the time to stop recording following the procedure in step 4. continued 19
-
 1
1 -
2
-
3
-
4
-
5
-
6
-
7
-
8
-
9
-
10
-
11
-
12
-
13
-
 14
14 -
 15
15 -
 16
16 -
 17
17 -
 18
18 -
 19
19 -
 20
20 -
 21
21 -
 22
22 -
 23
23 -
 24
24 -
25
-
26
-
27
-
28
-
29
-
30
-
31
-
32
 |
 |